
-
Introducing Detailed Product Review
Detailed Product Review extension was created to give you more information about customers' opinion and to express for your customers their thoughts and feelings about your products. As specialists discovered, one of the most important factors that influence customers decision is the opinion of others customers. This extension will help to make your store more interactive and attractive for people. The flexible set of settings allows you to create different ratings that will reveal the main theme of your site.
Statistics, analysis? What products are top-rated or less-rated? Which reviews were written last month? Need to know top-rated products from the particular category? Any information is available via Detailed Product Review! Do not spend money for nothing, you can plan your business to get more profit.
Create the review that will show the individuality of your site. Clothing, computers, media? Whatever your products are - you can customize reviews so that they will never look like on other sites. Simple Javascript review form doesn't take place on the page and its design will be surely liked by customers.
Are you afraid of spam? Need moderation, but have hundreds of products? Guests are disallowed to write reviews by default, pre-moderation of reviews is turned on so nobody will have an ability to write spam instead of a real review. Anyway, these features can be turned off - only you can decide who will have an opportunity to write reviews to your products.
-
Upgrade the Detailed Product Review
- 1. Create a backup. If you made some customizations in previous module version, you need to create copies of modified files to avoid changes override.
- 2. Disable the Magento Compiler (if it is enabled).
- 3. Important: Disable all types of cache used (Magento/FPC/Varnish/Redis, etc).
- 4. Upload archive to the Magento web root.
- 5. Extract files tar -xf archive.tgz -C ./ (instead of “archive.tgz” you have to use archive of MageWorkshop module).
- 6. Re-login into Magento Admin Panel.
- 7. Important: Re-enable and flush all Cache types. Skipping this step may cause issues with module installers apply and errors in module work!
- 8. Run Reindex Data (Click System > Index Management. On the left side is a list of categories that can be reindexed. Select "Product Attributes" and "Category Products" and run reindex. Or you can run a reindex for all categories, click Select All. From the Actions drop-down menu, select Reindex Data and then click Submit.)
- 9. Re-enable the Magento Compiler (if it was disabled on the step #2).
- 10. In case you have customizations in DetailedReview module - after module upgrade you need to merge changes manually and check if there are no issues in module work.
-
Detailed Product Review Extension: Installation
- 1. Before module installing, please make a backup of the Magento installation.
- 2. Disable the Magento Compiler (if it is enabled).
- 3. Important: Disable all types of cache used (Magento/FPC/Varnish/Redis, etc).
- 4. Upload archive to the Magento web root.
- 5. Extract files tar -xf archive.tgz -C ./ (instead of “archive.tgz” you have to use the archive of MageWorkshop module).
- 6. Re-login into Magento Admin Panel.
- 7. Important: Re-enable and flush all Cache types. Skipping this step may cause issues with module installers apply and errors in module work!
- 8. Run Reindex Data (Click System > Index Management. On the left side is a list of categories that can be reindexed. Select "Product Attributes" and "Category Products" and run reindex. Or you can run a reindex for all categories, click Select All. From the Actions drop-down menu, select Reindex Data and then click Submit.)
- 9. Re-enable the Magento Compiler (if it was disabled on the step #2).
- 10. Apply license keys for your stores.
Note that the extension package has included two obfuscated files:
- app / code / local / MageWorkshop / DetailedReview / Model / Observer.php
- app / code / local / MageWorkshop / DetailedReview / Helper / Data.php
That files containing part of the license generation algorithm.
If there is antivirus software installed on the server or there is one which is providing by hosting provider as part of the hosting service then there is possibility false-positive antivirus activation. To prevent it this files should be added to the ignore list. If above files have been deleted please use ones from the module package to restore them (unpack and copy them to the corresponding paths).
To Flush all Magento cache
- 1. Go to System -> Cache Management
- 2. Click on “select all” in the upper left corner
- 3. Under “action” click on “refresh” and click submit
- 4. Then click on these buttons:
-
- a. Flush Magento Cache.
- b. Flush Cache Storage.
- c. Flush Catalog Images Cache.
- d. Flush JavaScript/CSS Cache.
Login to Admin area and follow steps:
To Reindex Magento data
- 1. Go to System -> Index Management
- 2. Click on “select all” in the upper left corner
- 3. Under “Action” select “Reindex Data” and click Submit button
Login to Admin area and follow steps:
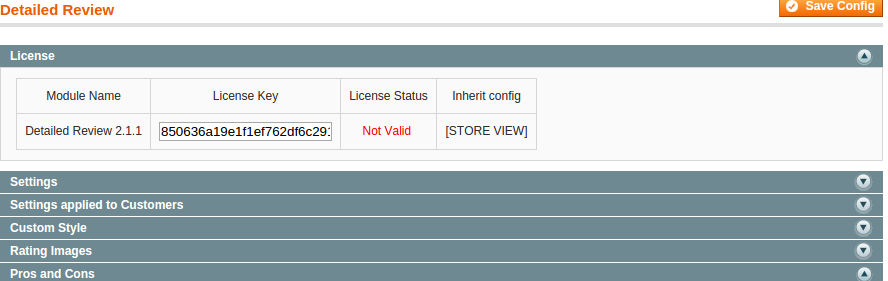
License Keys
To apply licenses for multi-domain you need to do following steps:
1) go to Admin panel: System-> Configuration -> MageWorkshop -> DetailedReview -> License and enter and save key, which was generated for domain, you are using for backend;
2) go to Current Configuration Scope dropdown
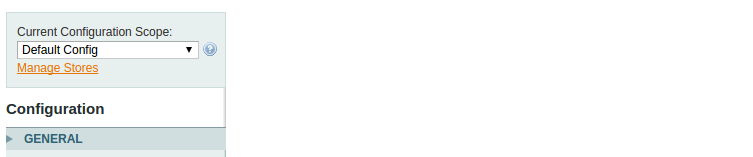
and select Store View, which is used for the frontend. In DetailedReview License config section uncheck Use Website option and enter a license key, which was generated for frontend domain.

Adjustment to support Ultimo theme
To fix overrides DR functionality in Ultimo theme, you need to make following modifications:
1) edit app/design/frontend/ultimo/default/layout/local.xml or app/design/frontend/ultimo/<YOUR-THEME>/layout/local.xml
1.1 Find rows
<action method="addTab" translate="title" module="review" ifconfig="ultimo/product_page/collateral_reviews">
<alias>tabreviews</alias>
<title>Reviews</title>
<block>review/product_view_list</block>
<template>review/product/view/list.phtml</template>
</action>
and place following code right after:
<action method="unsetChild" ifconfig="detailedreview/settings/enable"><block>tabreviews</block></action>
<action method="addTab" ifconfig="detailedreview/settings/enable"><alias>tab_reviews</alias>
<title>Product Reviews</title>
<block>detailedreview/wrapper</block><template>detailedreview/wrapperInTab.phtml</template>
</action>
1.2 Find line
<action method="append"><block>product.reviews</block></action>
and place following code right after:
<action method="unsetChild" ifconfig="detailedreview/settings/enable"><block>product.reviews</block></action>
1.3 Find line
<action method="addReviewSummaryTemplate">
<type>default</type>
<template>review/helper/summary_nolinks.phtml</template>
</action>
and replace it with:
<action method="addReviewSummaryTemplate">
<type>default</type>
<template>detailedreview/review/helper/summary.phtml</template>
</action>
Adjustment to support Porto Theme
To show review form in tab, use next fix for this
edit app/design/frontend/smartwave/porto/layout/local.xml or app/design/frontend/smartwave/<YOUR-THEME>/layout/local.xml
Find rows
<action method="addTab" translate="title" module="review"><alias>review_tabbed</alias><title>Reviews</title></action>
and place following code right after:
<block>review/product_view_list</block><template>review/product_info_review.phtml</template></action>
<action method="unsetChild" ifconfig="detailedreview/settings/enable"><block>review_tabbed</block></action>
<action method="addTab" ifconfig="detailedreview/settings/enable"><alias>tab_reviews</alias>
<title>Product Reviews</title>
<block>detailedreview/wrapper</block><template>detailedreview/wrapperInTab.phtml</template>
</action>
-
Detailed Product Review Extension: Configuration
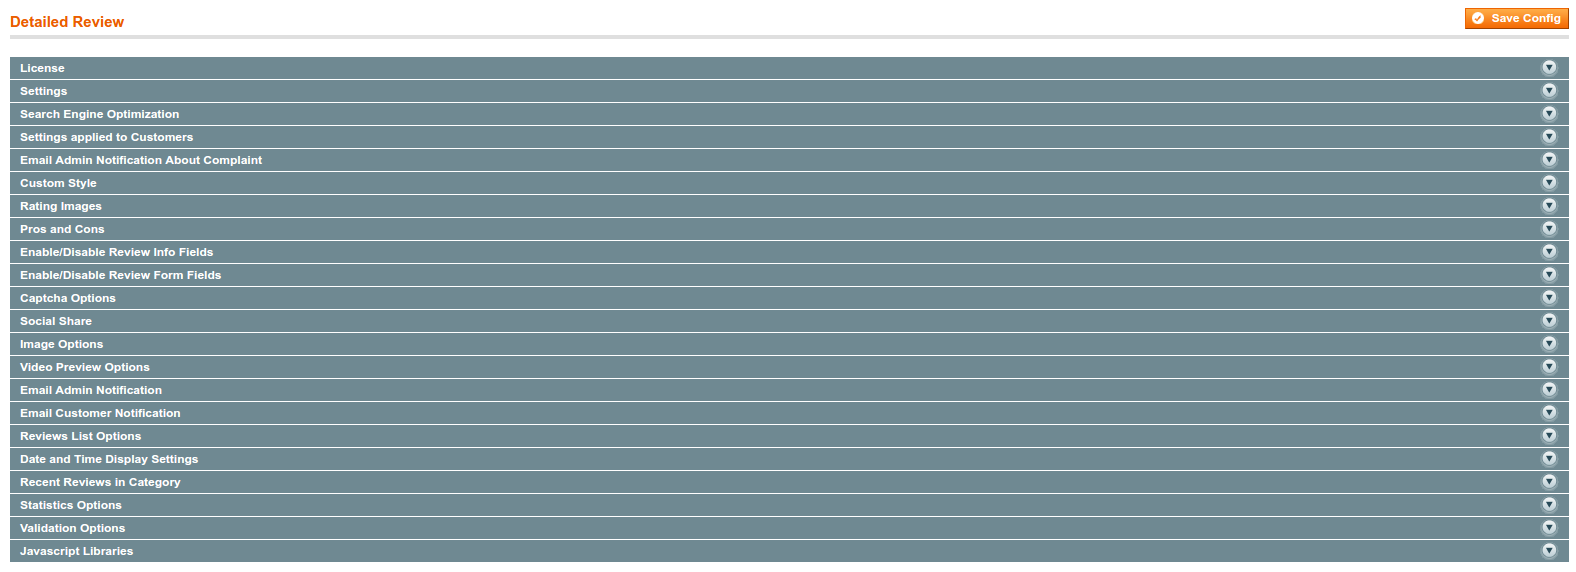
To configure Detailed Review extension you should login into Magento system and navigate to System → Configuration → Detailed Review configuration tab.
This configuration scope contains such sections:
- > License
- > Settings
- > Search Engine Optimization
- > Settings applied to Customers
- > Email Admin Notification About Complaint
- > Custom style
- > Rating Images
- > Pros and Cons
- > Enable/Disable Review Info Fields
- > Enable/Disable Review Form Fields
- > Captcha Options
- > Social Share
- > Image Options
- > Video Preview Options
- > Email Admin Notification
- > Email Customer Notification
- > Reviews List Options
- > Date and Time Display Settings
- > Recent Reviews in Category
- > Statistics Options
- > Validation Options
- > Javascript Libraries
Settings
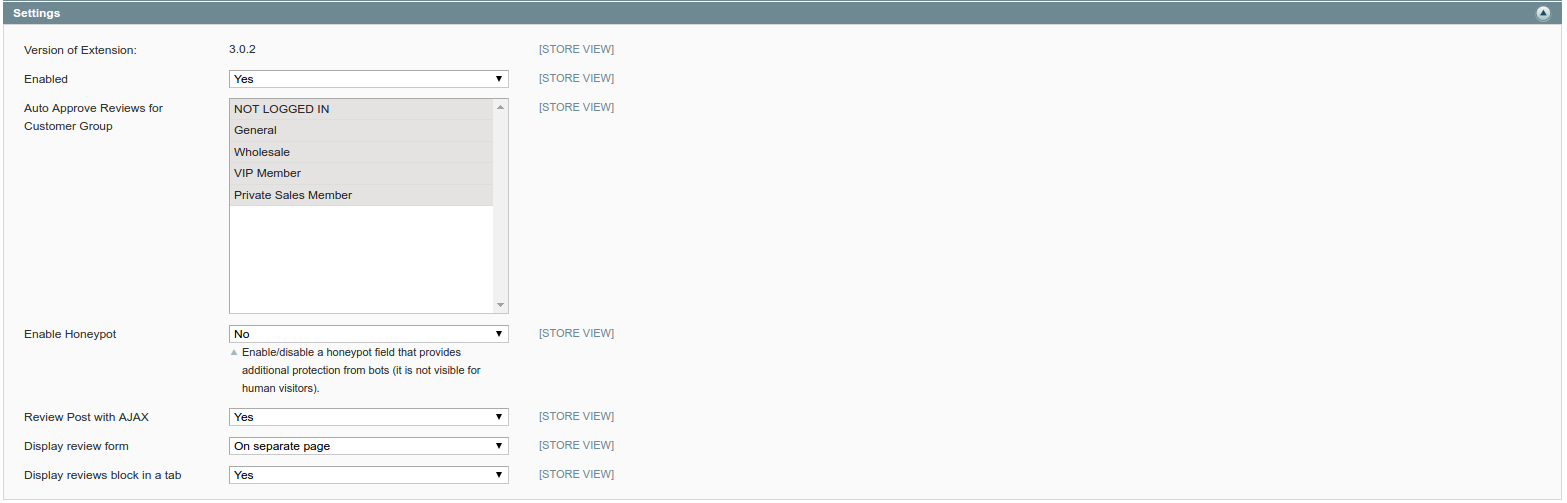
In Settings section such options are available in the drop-down list:
- - Enabled
- - Auto Approve Reviews for Customer Group
- - Enable Honeypot
- - Review Post with AJAX
- - Display review form
- - Display reviews block in a tab
Enabled - this option will switch the module on or off (“Yes” is the default option, extension turned on). In case<,> you select “No” extension will not be visible on the front-end and review-related functionality will degrade to default Magento’s one.
Auto Approve Reviews for Customer Group - allows to post a review directly without waiting when Admin approves it. You could specify the customer groups which can write a review without further pre-moderation.
Enable Honeypot - enable/disable a honeypot field that provides additional protection from bots (it is not visible for human visitors).
Review Post with AJAX - allows to post a review without page reload.
Display review form - this option allows to display review form directly on the product page, in the popup or on the separate page.
Display reviews block in a tab - allows to place the reviews block into “Reviews” tab, if your theme uses tabs on product page. When the option is set to “No”, the reviews block will be placed after tabs section.
Search Engine Optimization
Enabled rich snippets on Product page - enable/disable Rich Snippets (Details)
Review count available for rich snippets - this option sets how many reviews will be pass to google
Enable only for bot - this option sets visible Rich Snippets only for bots

Settings applied to Customers
Email Field - enable/disable Email field on Review Form to Guest.
Allow write review only for verified buyer - this option allows to write review only for buyer who bought current product.
Allow customer to write 1 Review per Product - this option allows to write one review for product per customer
Allow Guests to Vote for Review - allows or denies voting for review for guest users.
Show Verified Buyer Image - this option determines if verified buyer icon will be shown on front-end (under customer's name).
New Complaint Copy Method - this option determines if verified buyer icon will be shown on front-end (under customer's name).

Email Admin Notification About Complaint
Enable - enable/disable Email notification about complaint on a review/comment to admin.
Default Email Receiver - default receiver of complaints, from the Magento email settings list.
New Complaint Email Sender - sender of complaints, from the Magento email settings list.
Complaint Email Template - email template with complaint details.
New Complaint Email Copy To - list of additional emails for complaints receiver.
New Complaint Copy Method - methods of emails sending, BCC(blind copy not visible for other receiver) or copy of email to each receiver.

Custom Style
In this section added ability to set css style for Product page (customize block "Review")

Rating Images
In Rating Images section default (star) images for rating could be changed. Available states are “Active” and “Inactive”. These images will be displayed near Price, Value, Quality fields on the front-end (in case if appropriate options are enabled).

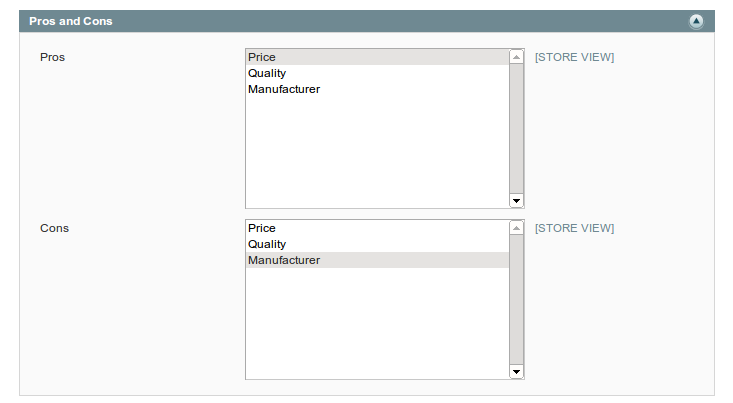
Pros and Cons
In "Pros and Cons" section, you can select Pros and Cons, that will be displayed on review form by default.
Enable/Disable Review Info Fields
Here you can enable or disable additional info fields which will be available for the user on front-end during writing review.
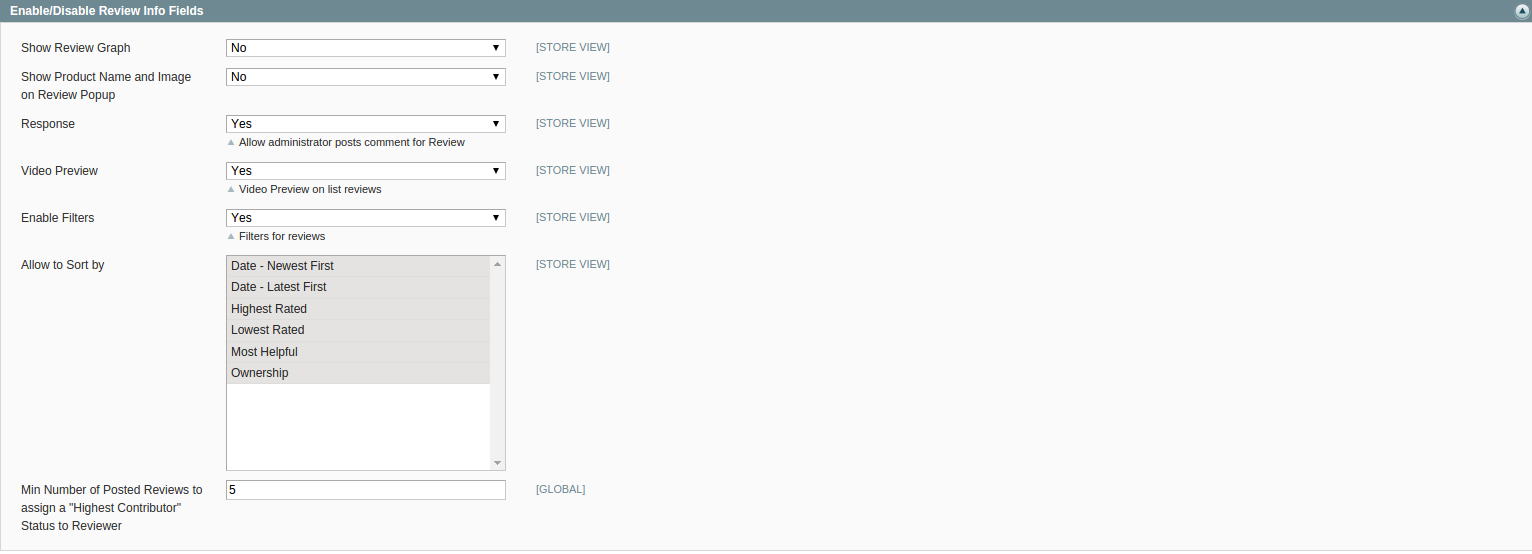
Admin has an ability to show/hide product Name and Image on the Review form in pop-up and on Review form on separate page

Enable/Disable Review Form Fields
Here you can enable or disable additional form fields which will be available for the user on front-end during writing review.

You can enable/disable filters here. They will be available on product page. It’s also possible to set min number of posted reviews to assign a “Highest Contributor” status to the reviewer.
Here you specify attributes by which user will have an ability to sort with on front-end. In case if some fields will not be selected, they will not appear in sorting drop-down on the front-end.
Captcha Options
Here you can enable reCAPTCHA which will be shown for users while applying for review.

You will need to register your domain on reCAPTCHA site and receive Public Key and Private Key to put them in Admin area:
- 1. Go to www.google.com/recaptcha/admin#list, log in with your google account and register your domain.
- 2. Enter your site name to Name field and domain to Domain field and click Registration button.
- 3. Copy Public Key and Private Key from reCAPTCHA website and paste to appropriate fields in Captcha Options section.
- 4. Turn on Captcha from Admin area and save changes.
Note: To register your domain you should have a Google account.
Domain registration for configuration Public and Private Keys.
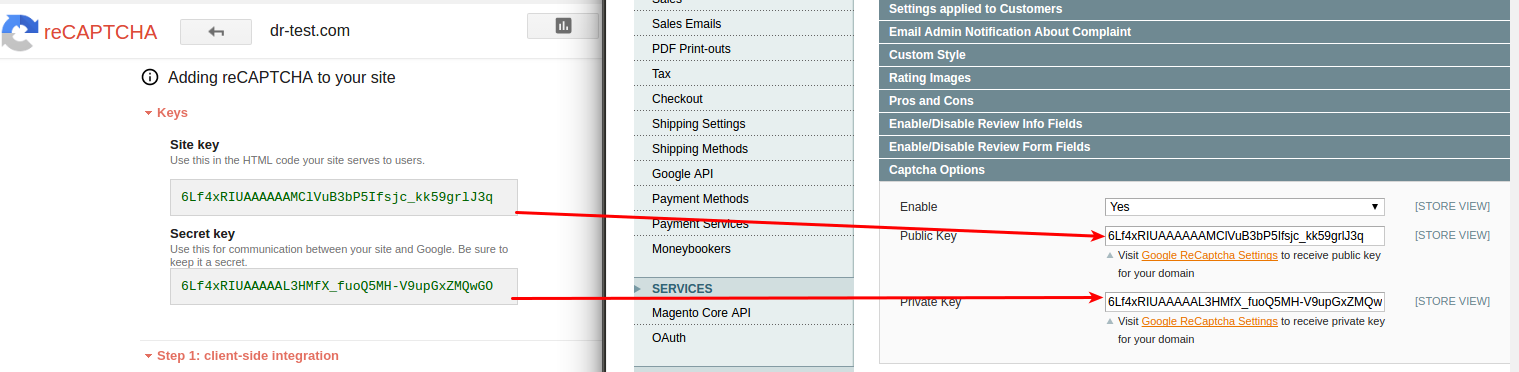
Image Options
You can configure image properties and the max number of images that could be uploaded with a review using the following options.

Video Preview Options
Here you could configure video size preview. Change preview width and height.

Email Admin Notification
Here you could configure options which are related to email sending. Event triggered when a new review is created.

To allow sending email notification, select “Yes” from the drop-down (in case you don’t need the email notification, select “No”).
Default Email Receiver - field allows to set emails receivers.
New Review Email Sender - field allows to choose a sender (to configure a new sender, go to System → Configuration → Store Email Addresses).
Review Email Template - field allows to choose email template to be applied.
New Review Email Copy To - adds additional recipient email, who will receive a copy of the email. If there are more than one recipient then a list of emails entered should be comma-separated. If this field is empty then the email will be sent to “Customer Support” only.
New Review Email Copy Method - gives a possibility to choose the preferable copy method of the email.
Email Customer Notification
This fields depends on "Settings applied to Customers -> Email Field" or it is necessary that the client has been logged in system.

Enable - enable/disable email customer notification.
Review Email Sender - field allows to choose a sender (to configure a new sender, go to System → Configuration → Store Email Addresses).
Review Email Template - field allows to choose email template to be applied.
Review Email Blind Copy To - field allows to send blind copy (Comma-separated. If empty then email will be send to 'Customer Support')
Reviews List Options
Gives an ability to choose default sorting method and quantity of reviews shown in the list.

Reviews per Page by Default - a number of reviews per page shown on the front-end.
Reviews per Page - here should be placed comma-separated values for "Show X per page" block on front-end.
Ordering - this option will determine default sorting behavior for front-end.
Date and Time Display Settings
Date and Time formats could be set by the following options.

Recent Reviews in Category
It gives an ability to configure sidebar slider and visibility of product image.

Display Recent Reviews - option allows/denies displaying of Recent Review block on the selected page(s).
Slider Effect - effect to be applied, when slides are changed. To see how it affects slider go to the front-end and check category's page, Recent Review and Recent Reviews by Category blocks (you should have some reviews there to check this functionality).
Number of Reviews in Slideshow - set maximum quantity of reviews for Recent Review and Recent Reviews by Category blocks.
Number of Visible Reviews in Slideshow - set the maximum of visible reviews for Recent Review and Recent Reviews by Category blocks. According to entered value, Recent Reviews block and Recent Reviews by Category block height will be increased if needed.
Rotation Speed - delay in seconds which will determine pause between slides change.
Show Product Image - allows/denies displaying product image in Recent Review and Recent Reviews by Category blocks on the category page
Statistics Options
Here you could configure options for dashboard which contains statistics for reviews.
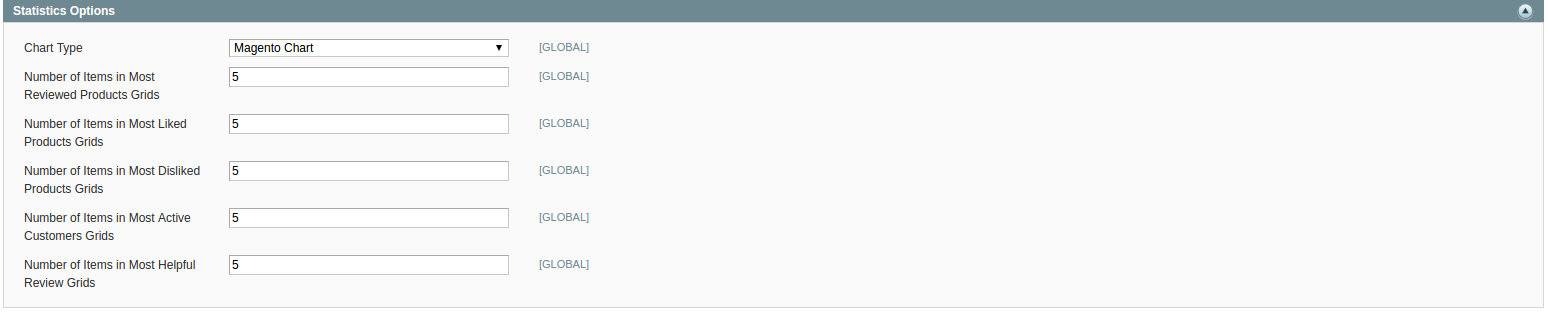
Chart Type - this is the type of chart to be shown in statistics area. Available chart types: Magento Chart, Line Chart, Column Chart, Area Chart.
Number of Items in Most Reviewed Products Grids - allows to set a maximum number of items in Most Reviewed Products Grid.
Number of Items in Most Liked Products Grids - allows to set a maximum number of items in Most Liked Products Grid.
Number of Items in Most Disliked Products Grids - allows to set a maximum number of Items for most disliked products in Most Disliked Products Grids.
Number of Items in Most Active Customers Grids - allows to set a maximum number of items for most active customers in Most Active Customers Grids.
Number of Items in Most Helpful Review Grids - allows to set a maximum number of items for most helpful reviews in Most Helpful Grids.
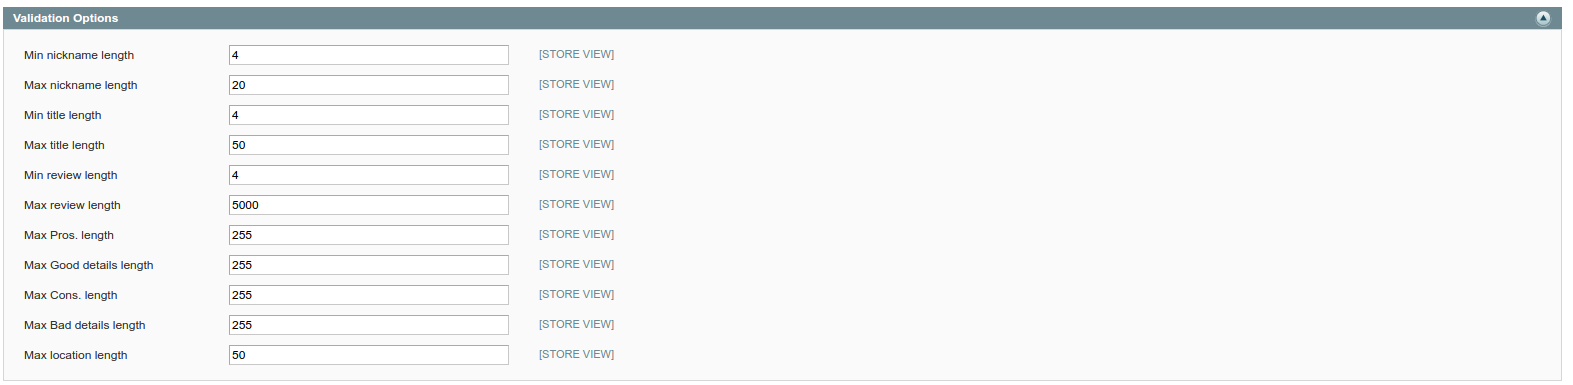
Validation Options
In this section you can set maximum and minimum length of input characters in fields of review form on frontend.
Javascript Libraries
In this section you can initialize JS libraries in local scope which will not intersect with external jQuery.
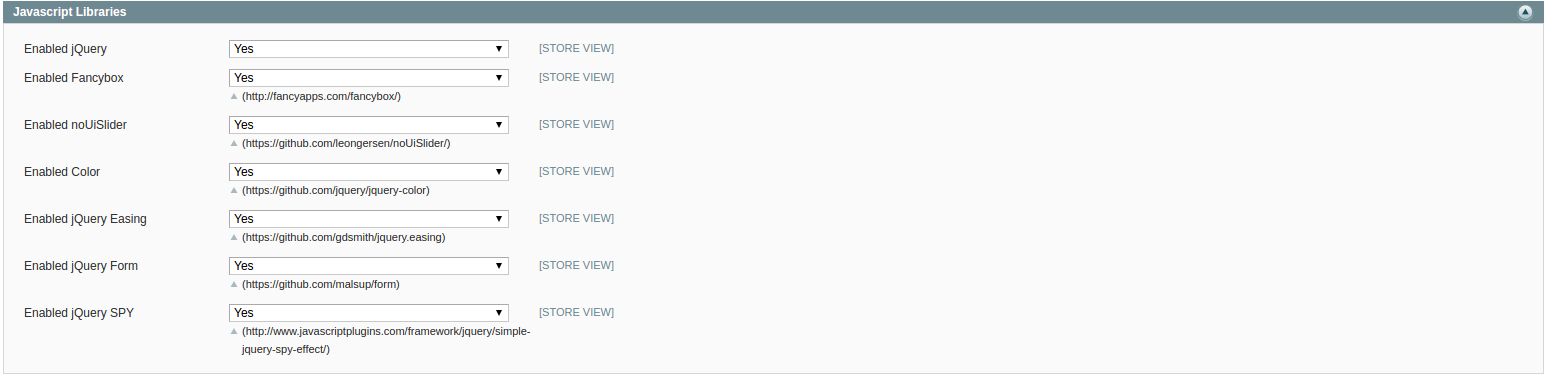
- 1) jQuery v1.11.3
- 2) jQuery UI v1.11.4 * Includes: core.js, widget.js, mouse.js, position.js, draggable.js, droppable.js, resizable.js, selectable.js, sortable.js, accordion.js, autocomplete.js, button.js, datepicker.js, dialog.js, menu.js, progressbar.js, selectmenu.js, slider.js, spinner.js, tabs.js, tooltip.js, effect.js, effect-blind.js, effect-bounce.js, effect-clip.js, effect-drop.js, effect-explode.js, effect-fade.js, effect-fold.js, effect-highlight.js, effect-puff.js, effect-pulsate.js, effect-scale.js, effect-shake.js, effect-size.js, effect-slide.js, effect-transfer.js
- 3) jQuery Color Animations [email protected]
- 4) jQuery Easing v1.3
- 5) jQuery SPY
- 6) jQuery Placeholder v2.0.7
- 7) noUislider v7.0.10
- 8) jQuery Form Plugin v3.51.0
- 9) Magnific Popup v1.0.0
jQuery in our extension is defined as DRjQuery global object to prevent conflicts with Magento extensions that also use jQuery libraries. If you use the same libraries you will have to assign your jQuery to it or replace DRjQuery string with jQuery in app/design/frontend/base/default/template/ folder. We recommend to attach required versions of jQuery and plugins by yourself and to use them instead of this file (otherwise most probably you will have 2 jQuery objects in memory and general plugins will be duplicated).
If you do not need to load these libraries in one file or you've already got this libraries loaded on your website, you can disable loading DRjQuery by changing "Enable jQuery and Other Plugins" option in detailed review settings and replace libraries with your versions. Note that this may cause errors in Javascript if not all needed libraries are included or they have incompatible versions.
-
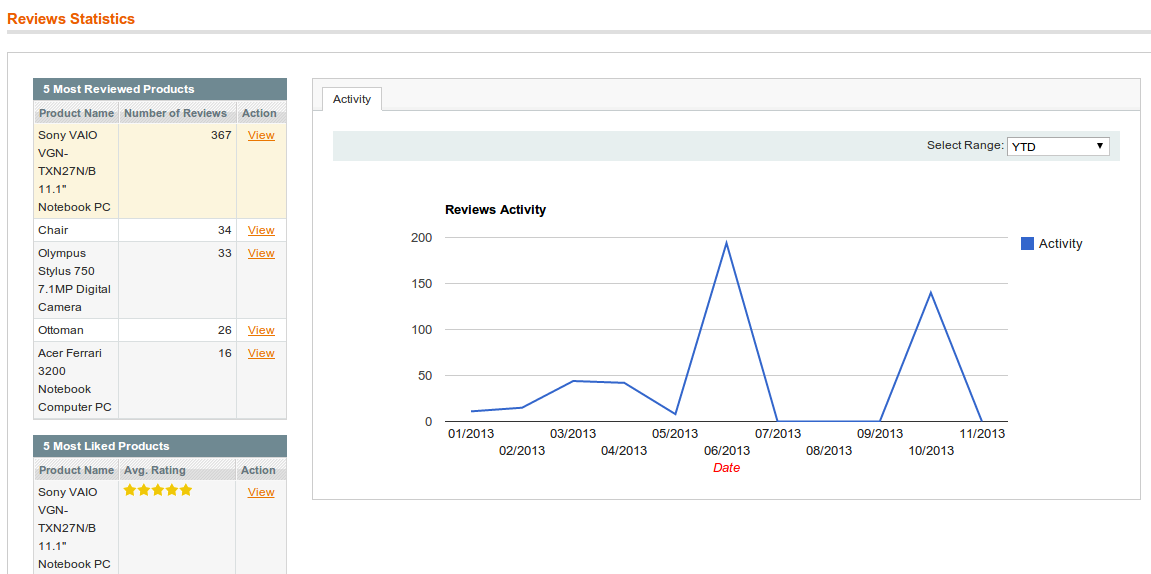
Detailed Product Review Extension: Reviews Statistics
To see Reviews Statistics go to Catalog → Reviews and Ratings → Customer Reviews → Reviews Statistics.
Image reviews statistics for Top Most Reviewed Products, Top Most Liked Products, Top Most Disliked Products, Top Most Active Customers, Top Helpful Review. There is an ability to navigate and to edit item directly from the grid.
-
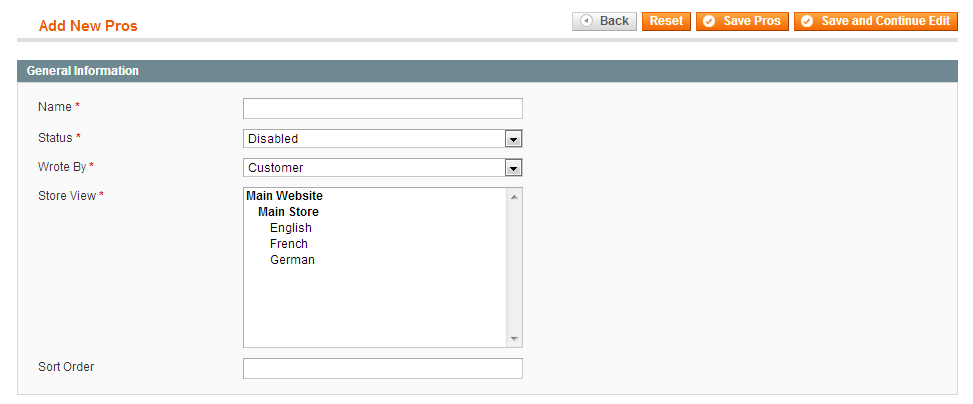
Detailed Product Review Extension: Adding New Pros and Cons
To add new Pros go to the Catalog → Reviews and Ratings → Customer Reviews → Pros and click Add Pros button.
- 1. In the Name field enter the title which will be shown in the Pros Management page and on Product page.
- 2. In the Status field select Enabled.
- 3. In Wrote By select Administrator.
- 4. In the Store View select the websites where Pros will be displayed.
- 5. The Sort Order field allows specifying the sequence of properties displaying.
Click the Save Pros button.
-
Detailed Product Review Extension: User-defined Pros and Cons Management
Pros and Cons which are added manually, will be included in list and appear in Admin area so Admin will be able to add them as standard ones. To configure Pros and Cons go to the Catalog → Reviews and Ratings → Customer Reviews → User-defined Pros and Cons. There will be a grid with all pros and cons which were predefined previously by Admin as far as manually entered by review author’s.
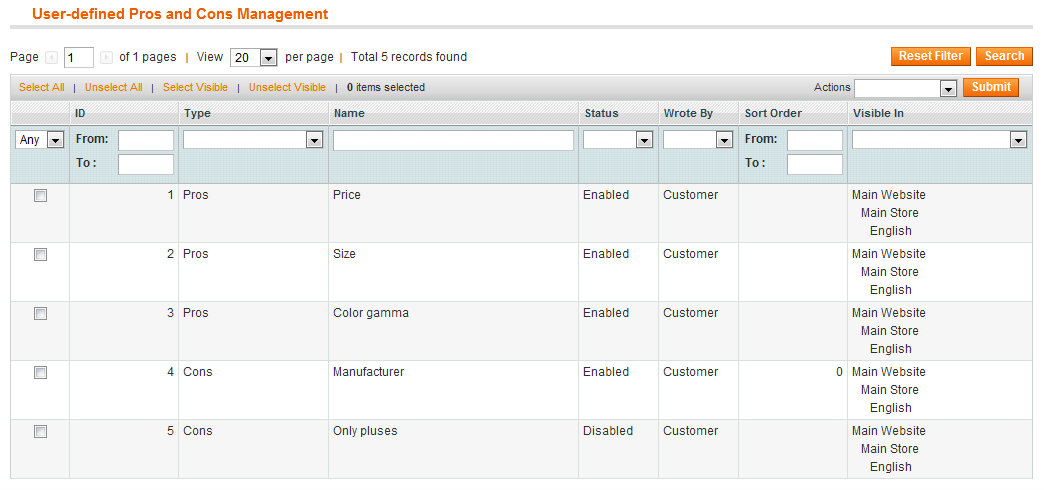
If you click on Pros or Cons you will be able to edit it. There are options which allowing you to change Name, Status (if “Enabled” is chosen this item appear in Pros or Cons section on front-end), Wrote By, Store View and Sort Order.
-
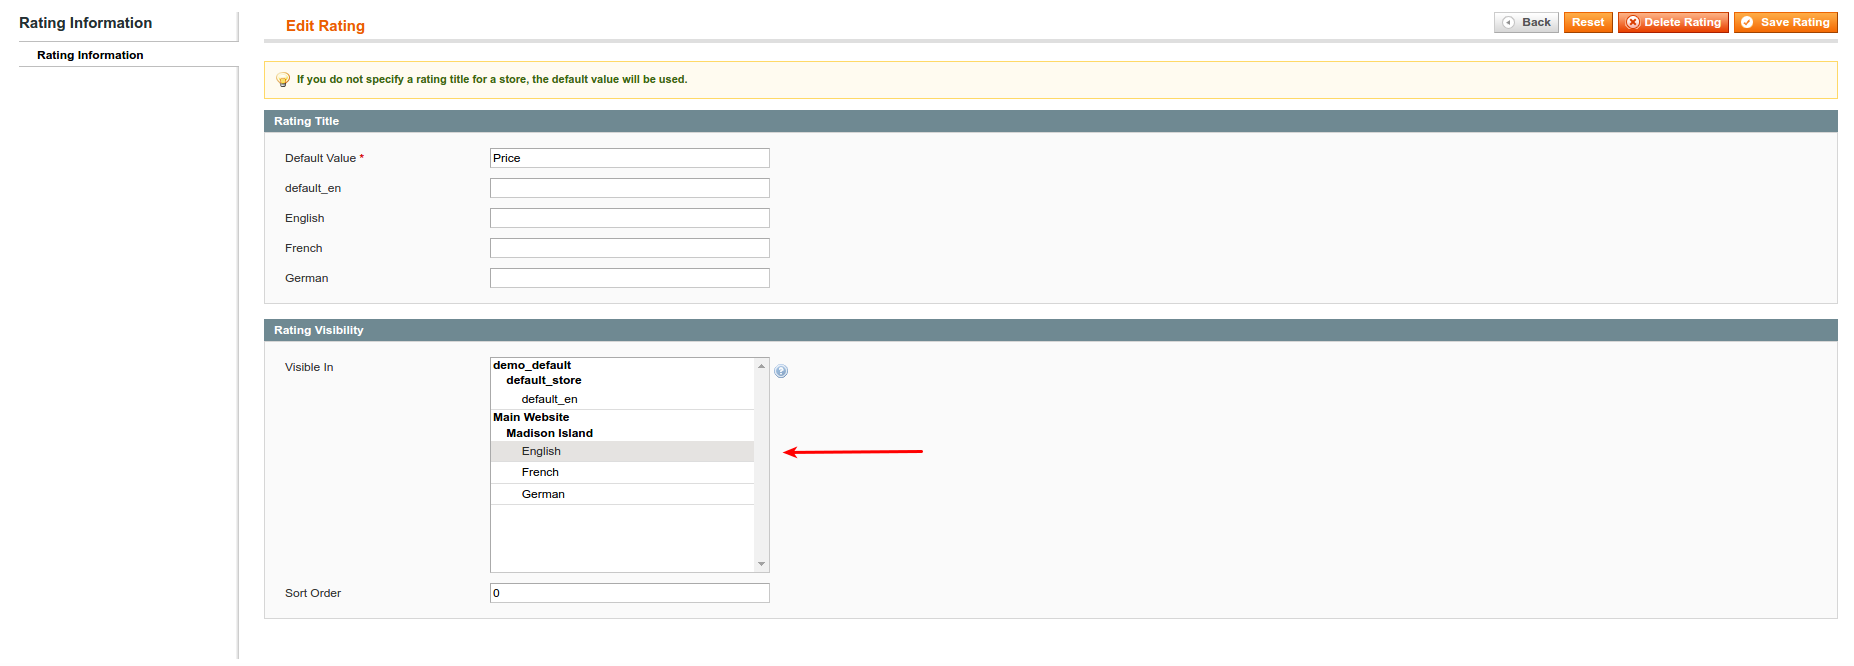
Detailed Product Review Extension: Manage Ratings
To display(manage) rating stars
Login to the admin area, go to Catalog -> Review and Rating -> Manage and Rating, select the value for rating (Price, Quality, Value), click on it, make visible for the store and save changes. Please check that the default Magento Review module enabled, System -> Configuration -> Advanced and find the Mage_Review, Make sure that the status Enable.

If you click on Pros or Cons you will be able to edit it. There are options which allowing you to change Name, Status (if “Enabled” is chosen this item appear in Pros or Cons section on front-end), Wrote By, Store View and Sort Order.
-
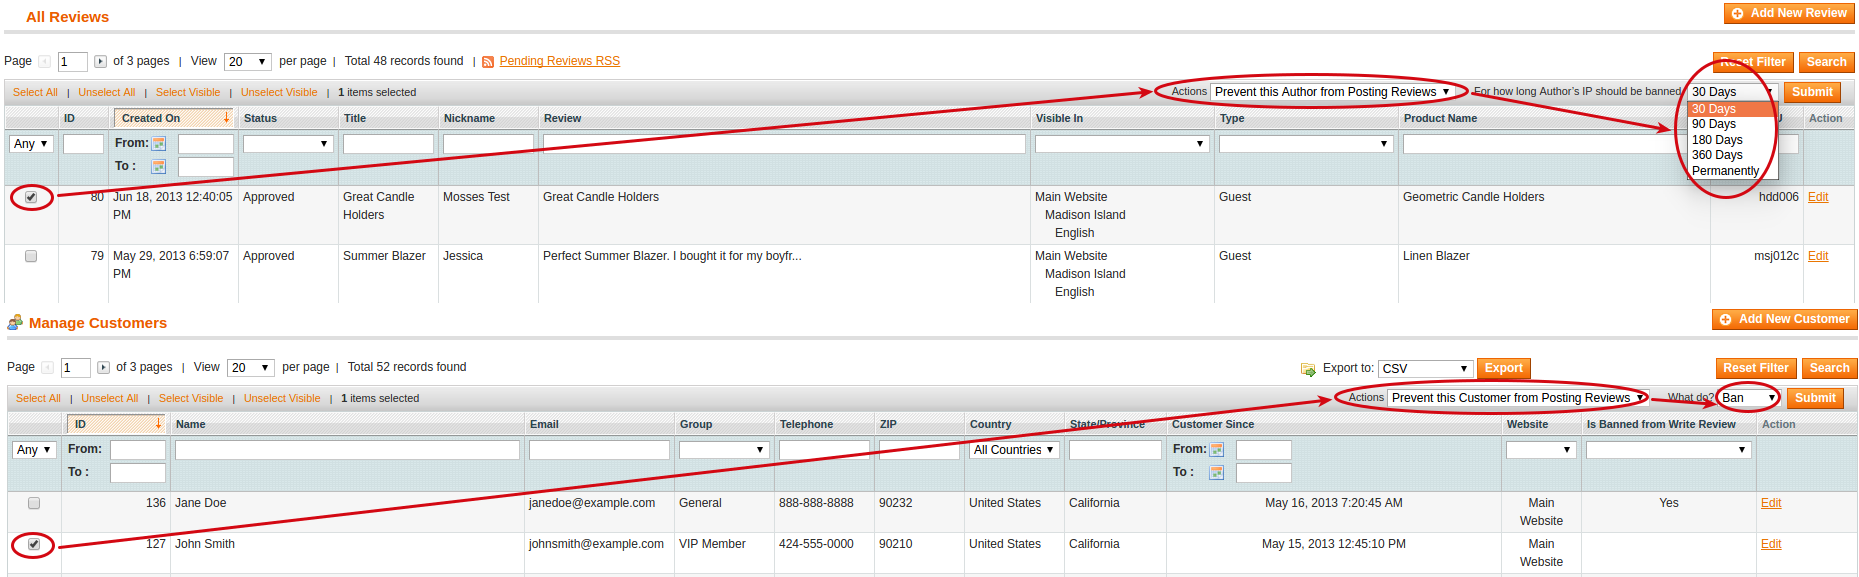
Detailed Product Review Extension: Ban Functionality
There is an ability to ban author of a review so he will not be able to write further reviews. You could check review, select "Prevent this Author from Posting Reviews" option and choose for how long Author's IP should be banned. In case, the author was logged into the system when he was writing the review then the customer will be banned from writing the review. Otherwise, IP will be banned. You should be aware that several devices could use same external IP which might lead to the false-positive bans.
There are two ways for ban: go to Catalog → Reviews and Ratings → Customer Reviews → All Reviews or go to Customers → Manage Customers.
To unblock banned author of review do the same steps, but select “Lift Ban” option from the drop-down.
-
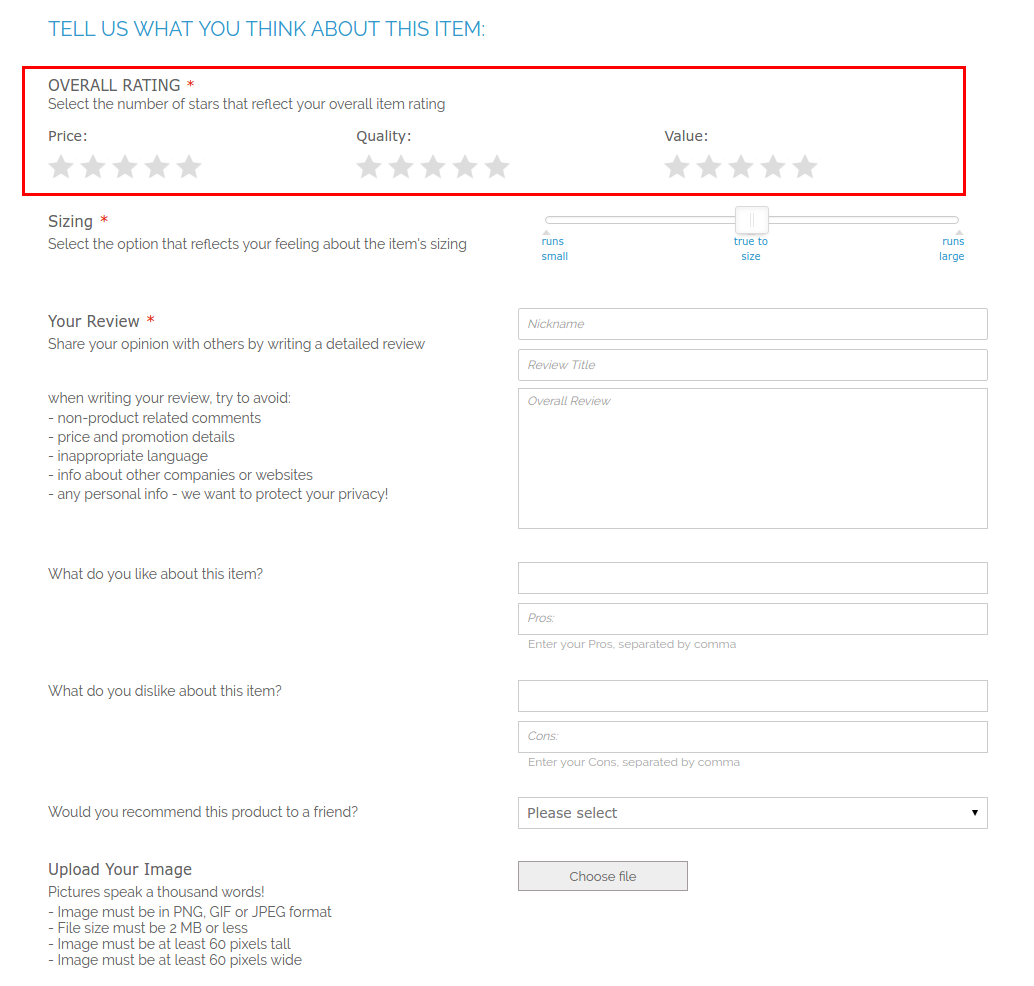
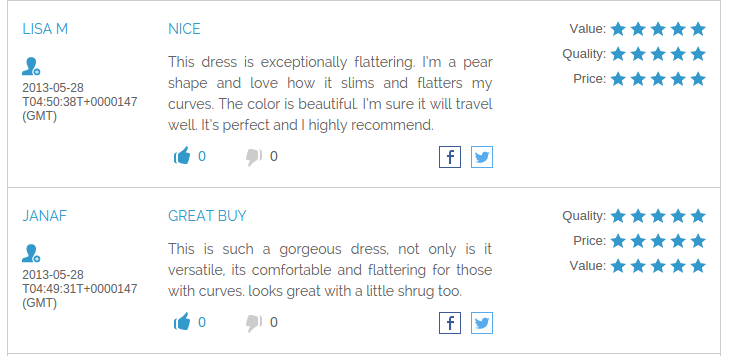
Detailed Product Review Extension: Front-end Interface for Posting Review
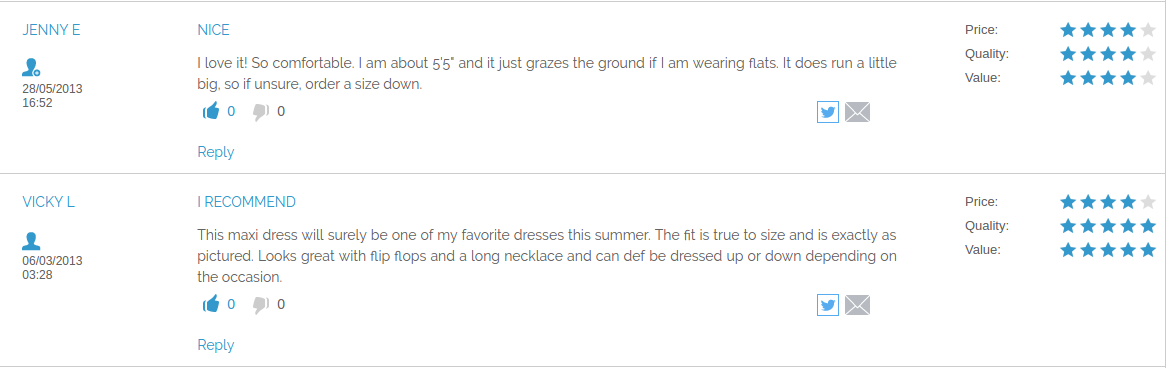
Click here to see enlarged image.
- 1. Rating section
- 2. Sizing section
- 3. Good and Bad Details section
- 4. Pros and Cons section
- 5. User Defined Pros and Cons section
- 6. Would you recommend to a friends list
- 7. Image section
- 8. Video section
- 9. About you section
- 10. Captcha section
- 11. Administration Response section (to post response to review go to the appropriate review in Admin area, input message to “Administration Response” field and save)
-
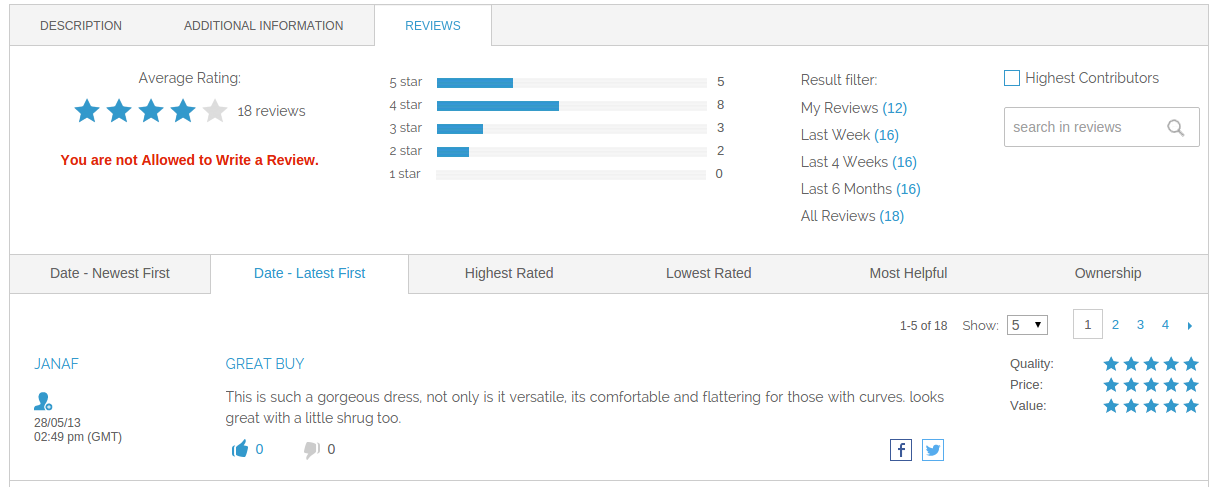
Detailed Product Review Extension: Demonstration of Store Area for Banned Author of Review
-
Detailed Product Review Extension: Configuration of Fields Available for Particular Category
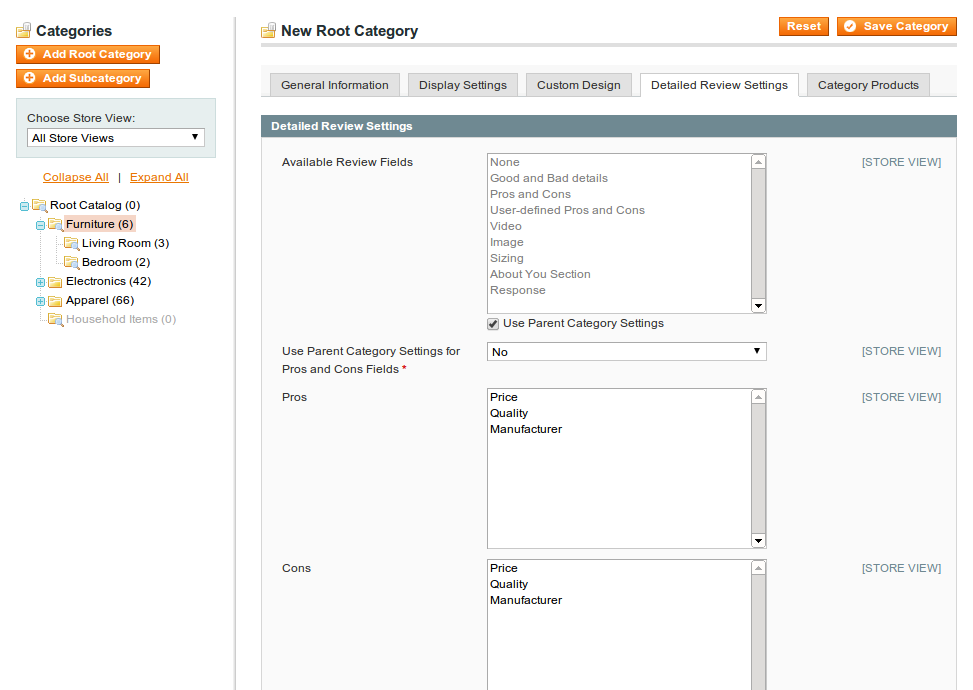
There is an ability to configure the available review fields and different pros and cons depending on different categories. In this way, the store owner will gain an ability to have the different review options for different categories so, for example, Body Type will not appear in “Electronics” section. To utilize this feature go to Catalog → Manage Categories → {Category_name} and switch to the Detailed Review Settings tab. Find Available Review Fields, Pros and Cons, select necessary attributes and save changes. If you mark the checkbox for “Use Parent Category Settings for Review Fields” this attribute will inherit the value from the parent. The available review fields section becomes not editable. The same for "Use Parent Category Settings for Pros and Cons Fields" option.
-
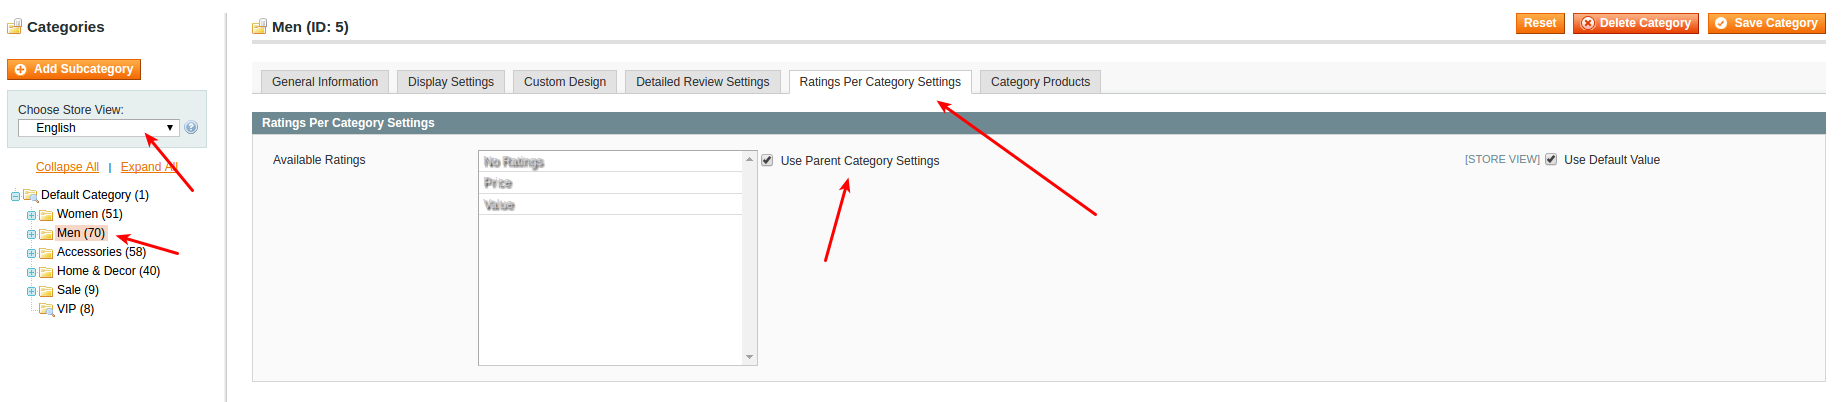
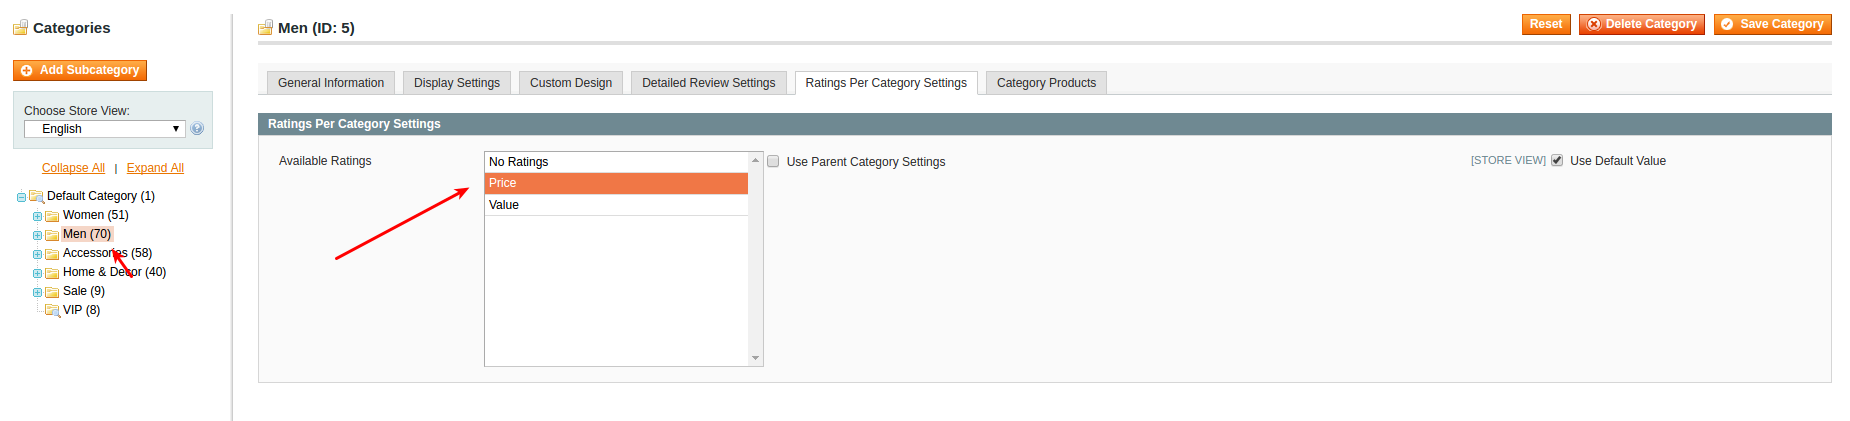
Detailed Review Extension: Configuration of Ratings Per Category
There is an ability to configure the available ratings for different categories. In this way, the store owner will gain an ability to have the different ratings for different categories in accordance with the specific products characteristics. To utilize this feature go to Catalog → Manage Categories → {Category_name} and switch to the Ratings Per Category Settings tab. Select necessary attributes and save changes. If you mark the checkbox for “Use Parent Category Settings for Review Fields” this attribute will inherit the value from the parent.
-
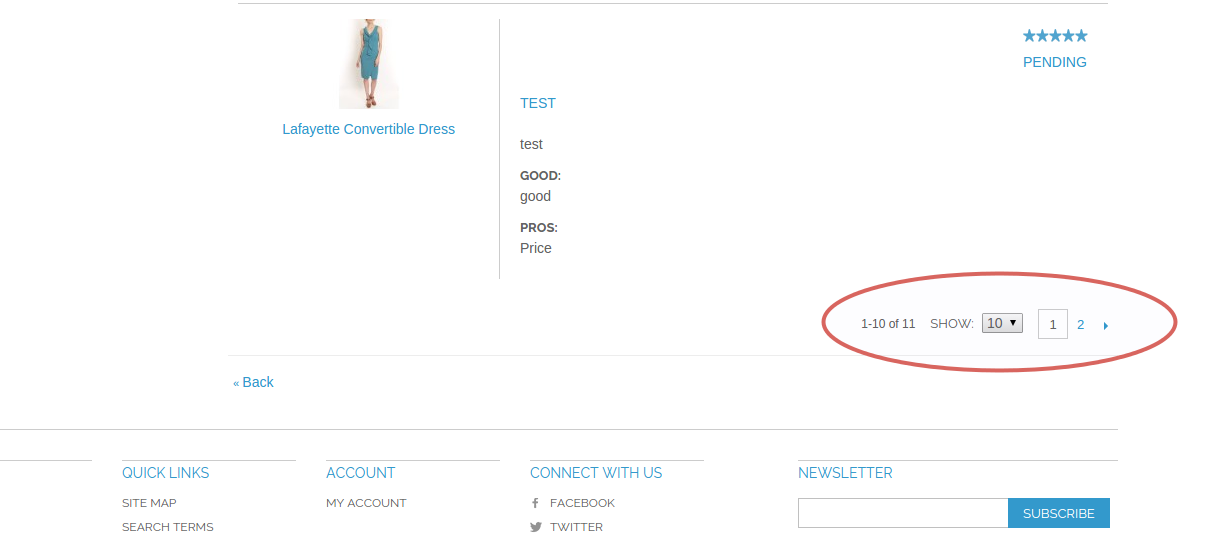
Detailed Product Review Extension: My Reviews in My Account Section
Registered customer has the ability to look through own reviews from the My Account section. Login to the shop and go to the My Account → My Reviews. There will be a statistical data about the review and all own reviews.
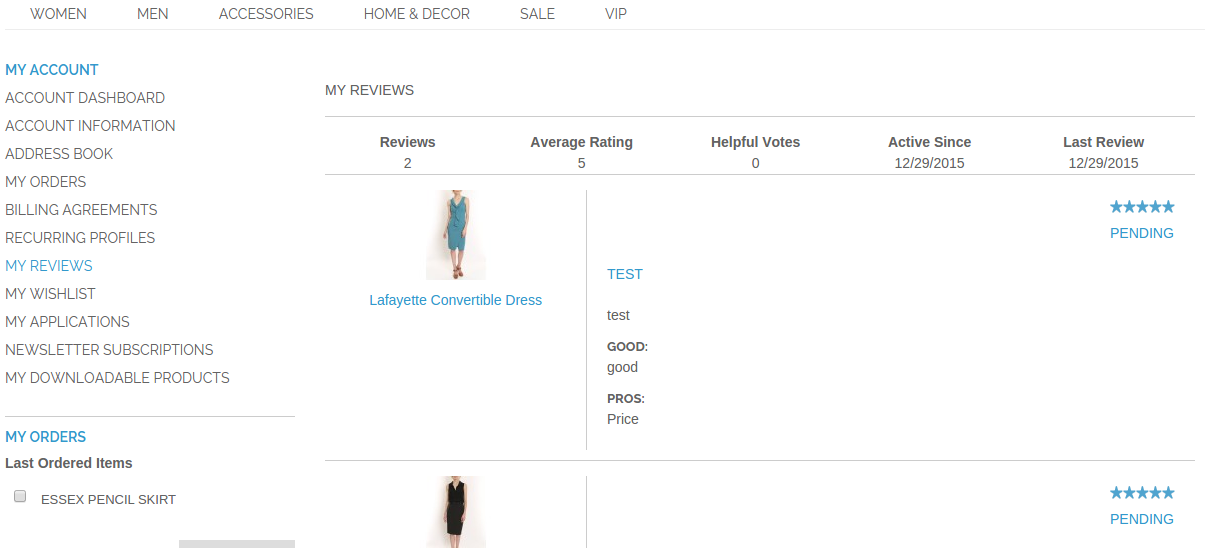
Automatically added pagination if customer has more then 10 reviews.
-
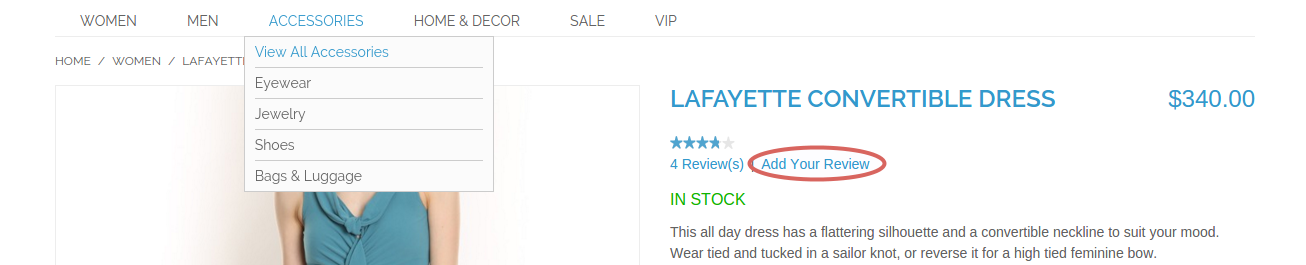
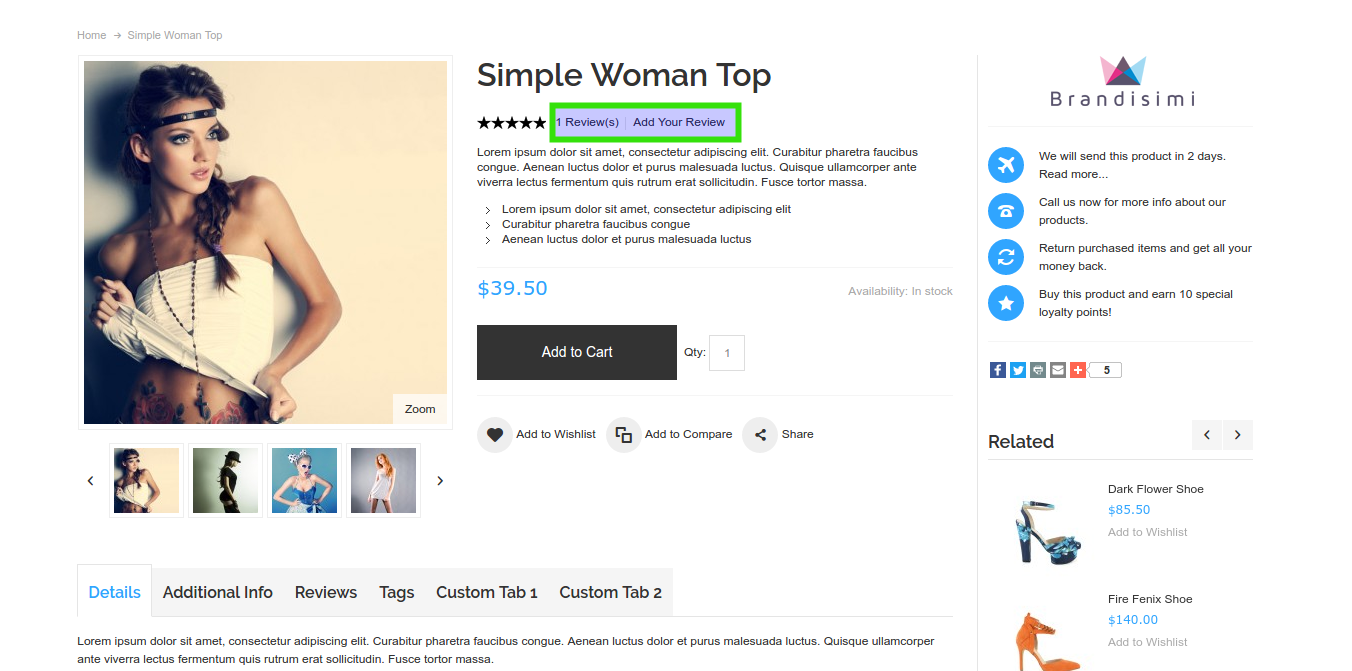
Detailed Product Review Extension: "Add your Review" link
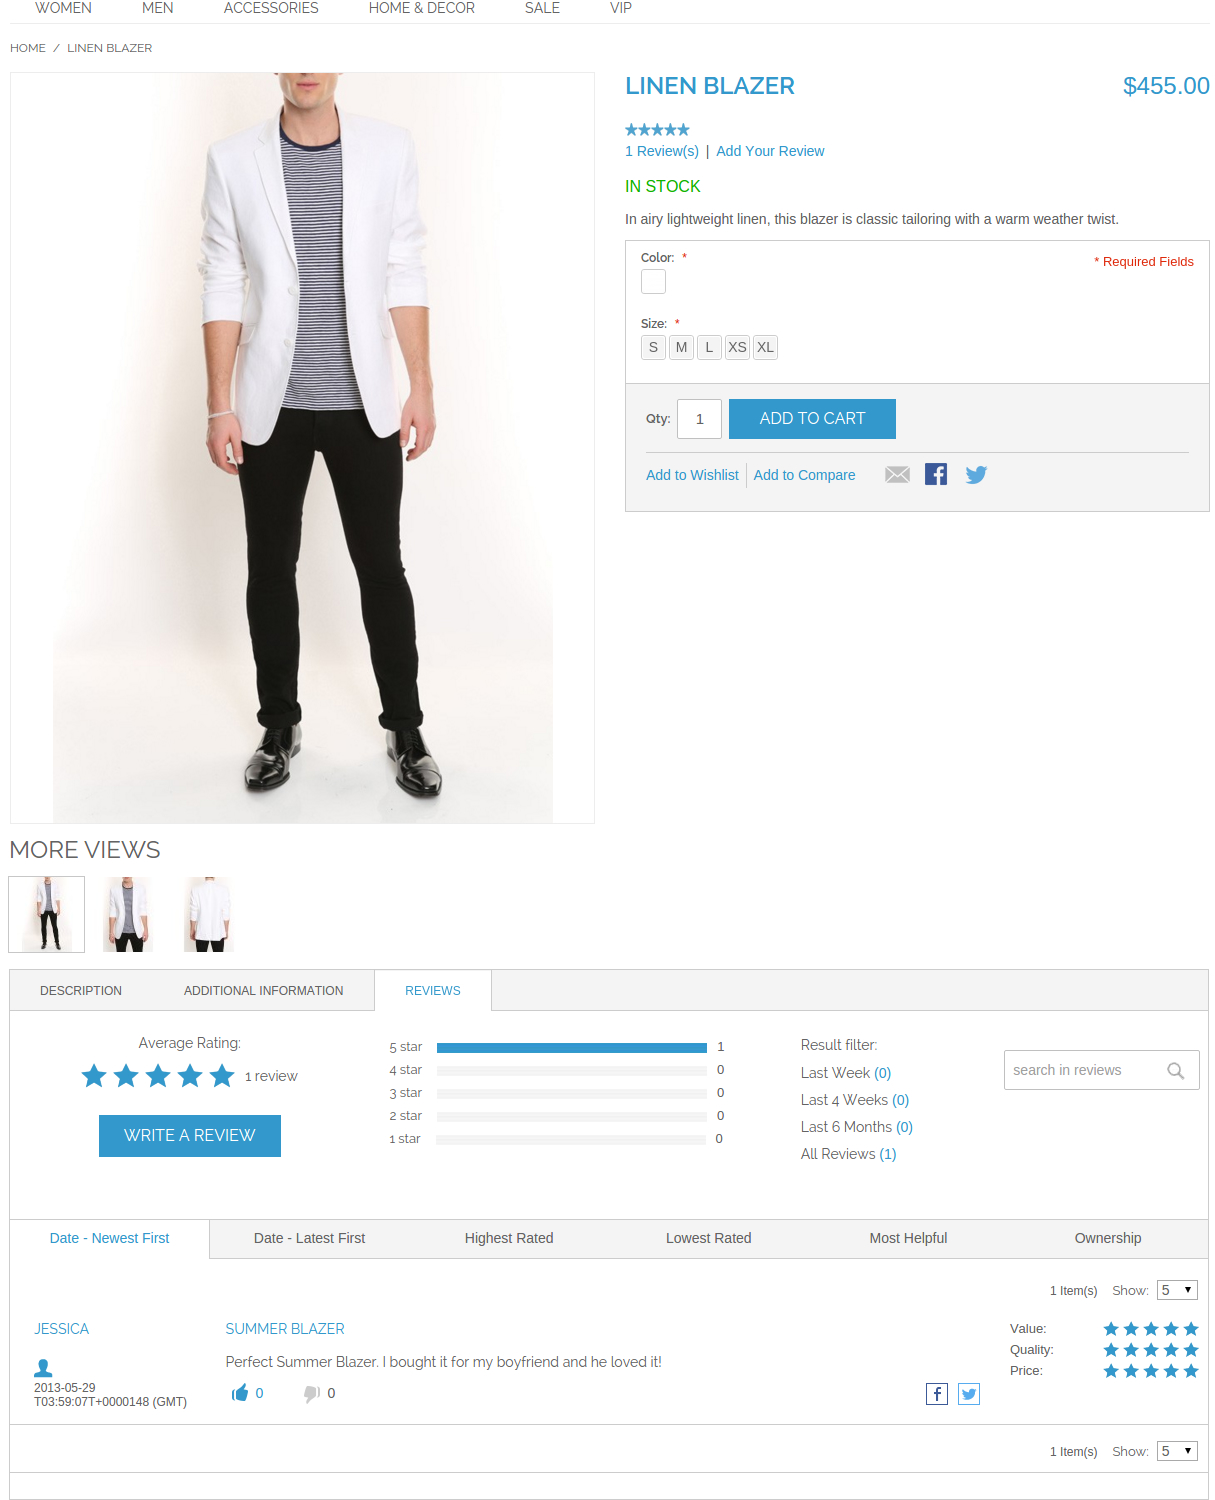
Customer can use "Add Your Review" link on Product page for adding a review.
-
Detailed Product Review Extension: Detailed Product Review attributes
Added DetailedReview attributes in Magento Global attributes
Catalog->Attributes->Manage Attributes

-
Detailed Product Review Extension: How to Translate Detailed Product Review Extension
There are two main ways to translate Detailed Product Review extension.
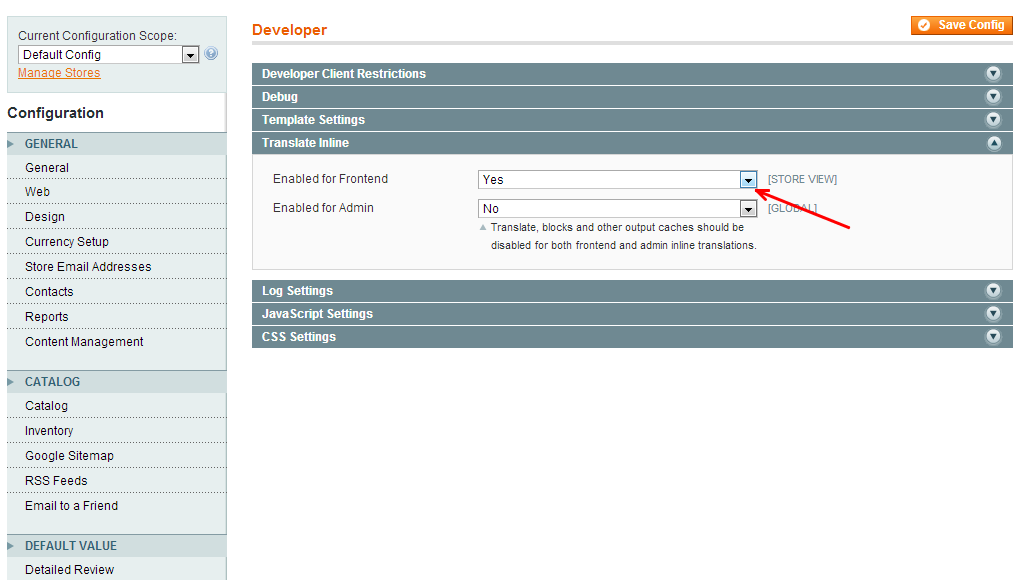
In the first case, you could turn on Translate Inline functionality. Go to Admin area System → Configuration → Developer → Translate Inline section and set to Yes the Enabled for Frontend. Inline translate does not always work properly, though. So you might want to use second way.
In second case if some labels couldn't be translated using Translate Inline feature, go to /app/locale/es_ES/ (if there is no such folder, navigate to Admin area System → Configuration → Design → Themes → Translations and check the locale folder name after this create new folder under /app/locale/{LOCALE_FOLDER_NAME}/) then copy to this folder the MageWorkshop_DetailedReview.csv file and edit it. There will be a list of items which are already added to CSV file. To translate a particular item edit label in the second column and save changes. If wording what you are looking for, is not there, then write it manually in the first column in quotes (spelling should match exactly) and in the second column write translated value using a comma to separate them.
When translation is finished, clean Magento cache and reload page to see changes.
For example: “Write a Review”, “Оставить отзыв”.

You can get the localisation files on the GitHub account https://github.com/MageWorkshop/localization. Feel free to share your translation with us via Pull Request (https://yangsu.github.io/pull-request-tutorial/). We will be appreciated.
We have a partly translated such languages:
- 1. de_DE, Deutsch - German locale. Contains not a full translation. Starting from line 412, the text didn't translate but we recommend check all files.
- 2. he_IL, Hebrew - Israel locale. Contains not full translation. Starting from line 93, the text didn't translate but we recommend check all files.
- 3. nl_NL, Dutch - Netherlands locale. Contains not full translation. Starting from line 50, the text didn't translate but we recommend check all files.
- 4. ru_RU, Russian - Russian locale. Contains not full translation. Starting from line 90, the text didn't translate but we recommend check all files.
-
Detailed Product Review Extension: Review Placeholder
Detailed Product Review extension supports the review placeholder. You could use this feature at any point in any place on the product page. Just insert the next tag < div class="reviews-placeholder"> </div> in that place where you want to see the review section.
Basically for this you need to edit file: app/design/frontend/<THEME_PATH>/template/catalog/product/view.phtml.
-
Detailed Product Review Extension: Using custom theme
To use Detailed Product Review extension in your custom theme, you need to do the following steps:
1) copy files from app/design/frontend/base/default/template/detailedreview to the app/design/frontend/<DEFAULT_THEME_PATH>/template/detailedreview directory. This step is required if some of the review templates have to be modified;
2) copy files from skin/frontend/base/default/css/detailedreview to the skin/frontend/<DEFAULT_THEME_PATH>/css/detailedreview directory and skin/frontend/base/default/images/detailedreview to the skin/frontend/<DEFAULT_THEME_PATH>/images/detailedreview directory. Copy files from skin/frontend/base/default/scss/detailedreview to the skin/frontend/<DEFAULT_THEME_PATH>/scss/detailedreview directory. This step is required if you need to change CSS styles of the review;
3) if you have multiple stores that require different styles then you have to copy all this files to the folder with the store theme files, not the default one.
Paths for single store usually look like this:
- - app/design/frontend/default/default/...
- - skin/frontend/default/default/...
If you have multiple stores then probable path will differ:
- - app/design/frontend/default/<STORE_THEME_NAME>/...
- - skin/frontend/default/<STORE_THEME_NAME>/…
-
Detailed Product Review Extension: Javascript Libraries
For now our extension uses such Javascript libraries:
- 1) jQuery v1.11.3
- 2) jQuery UI v1.11.4 * Includes: core.js, widget.js, mouse.js, position.js, draggable.js, droppable.js, resizable.js, selectable.js, sortable.js, accordion.js, autocomplete.js, button.js, datepicker.js, dialog.js, menu.js, progressbar.js, selectmenu.js, slider.js, spinner.js, tabs.js, tooltip.js, effect.js, effect-blind.js, effect-bounce.js, effect-clip.js, effect-drop.js, effect-explode.js, effect-fade.js, effect-fold.js, effect-highlight.js, effect-puff.js, effect-pulsate.js, effect-scale.js, effect-shake.js, effect-size.js, effect-slide.js, effect-transfer.js
- 3) jQuery Color Animations [email protected]
- 4) jQuery Easing v1.3
- 5) jQuery SPY
- 6) jQuery Placeholder v2.0.7
- 7) noUislider v7.0.10
- 8) jQuery Form Plugin v3.51.0
- 9) Magnific Popup v1.0.0
jQuery in our extension is defined as DRjQuery global object to prevent conflicts with Magento extensions that also use jQuery libraries. If you use the same libraries you will have to assign your jQuery to it or replace DRjQuery string with jQuery in app/design/frontend/base/default/template/ folder. We recommend to attach required versions of jQuery and plugins by yourself and to use them instead of this file (otherwise most probably you will have 2 jQuery objects in memory and general plugins will be duplicated).
If you do not need to load these libraries in one file or you've already got this libraries loaded on your website, you can disable loading DRjQuery by changing "Enable jQuery and Other Plugins" option in detailed review settings and replace libraries with your versions. Note that this may cause errors in Javascript if not all needed libraries are included or they have incompatible versions.
-
Detailed Product Review Extension: Changing default "Body Type" labels/images on review form
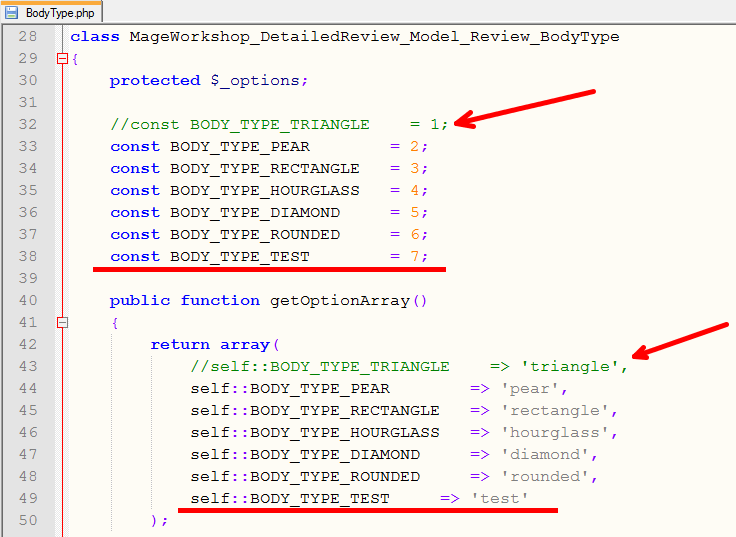
To change "Body Type" you need to go to the file app/code/local/MageWorkshop/DetailedReview/Model/Review/BodyType.php, change/add/remove options in getOptionArray() method and remove/edit/add constant of this class. Constants and values should be unique. Then go to skin/frontend/base/default/images/detailedreview/bodytypes/ and add here file(s) using such naming convention "[option_name]-shape.png". On review form body types is used CSS sprite, so you need to create similar sprite with your images and find appropriate CSS properties (backgrounds) in skin/frontend/base/default/css/detailedreview/detailedreview.css and then adjust offsets to fit your sprite.
Try not to change constants' value if you need to edit type, because these values are stored in the database.
If you need to remove some type, you need to execute this SQL script as well (this will delete all information about body type from all reviews):
UPDATE `review_detail` SET `body_type`= NULL WHERE `body_type` = [VALUE]. Here [VALUE] is the constant that represents body type. For example for BODY_TYPE_TRIANGLE [VALUE] is 1.
-
Detailed Product Review Extension: Adding custom fields
In this tutorial, we'll add Custom "Gender" review field to the review form to give an idea of adding/altering form fields.
To avoid problems with extension upgrade, customizations should be made in separate module. Default location for the module in Magento installation will be {magento_root}/app/code/local/MODULE_NAME/ or {magento_root}/app/code/community/MODULE_NAME/
In this example, we'll put module in the MageWorkshop location (which is the same to other submodules of the Detailed Review extension)
Step 1. Create module structure. It includes creating module configuration files and observer model.
- 1) First, we'll create a folder which will contain our module. In this example, this will be app/code/local/MageWorkshop/Gender
- 2) We need to let Magento know about our module so Magento will take into consideration our classes, and resources. To do so we need to add config.xml . When Magento initializes it's core it will parse it and get information about our module. So adding file app/code/local/MageWorkshop/Gender/etc/config.xml with basic configuration:
<?xml version="1.0"?> <config> <modules> <MageWorkshop_Gender> <version>1.0.0</version> </MageWorkshop_Gender> </modules> <global> <models> <mageworkshop_gender> <class>MageWorkshop_Gender_Model</class> <resourceModel>mageworkshop_gender_resource</resourceModel> </mageworkshop_gender> <mageworkshop_gender_resource> <class>MageWorkshop_Gender_Model_Resource</class> </mageworkshop_gender_resource> </models> <resources> <mageworkshop_gender_setup> <setup> <module>MageWorkshop_Gender</module> <class>Mage_Core_Model_Resource_Setup</class> </setup> </mageworkshop_gender_setup> </resources> </global> </config> -
3) This tutorial is based on Event Observer using. An Observer in Magento listens for when specific events fire, and then executes code we have defined to listen to that observer. So, we need to create observer model file app/code/local/MageWorkshop/Gender/Model/Observer.php, which will be used in next steps :
<?php class MageWorkshop_Gender_Model_Observer { } -
4) Next, we will configure and activate our module by creating config file MageWorkshop_Gender.xml in the app/etc/modules directory with the following content:
<?xml version="1.0"?> <config> <modules> <MageWorkshop_Gender> <active>true</active> <codePool>local</codePool> <depends> <Mage_Catalog /> <MageWorkshop_Core /> <MageWorkshop_DetailedReview /> </depends> </MageWorkshop_Gender> </modules> </config> This file will tell Magento about the location of our module, so, you need to change <codePool> section if not "local" folder is used.
Step 2. Add new field into database.
For saving new field into database, we'll create installation script, which will add our custom field to 'review_details' table. We need to create file app/code/local/MageWorkshop/Gender/sql/mageworkshop_gender_setup/install-1.0.0.php and paste code from script examples below. Here are examples for different field types. You need to modify it regarding to your needs. In our case, "Gender" field should be presented on frontend as select box.
Example 1 - Add "Gender" field (for select or radio input type)
Example 2 - field for text or multiselect(checkbox) input
Step 3. Add custom field into Admin Review edit section. To have ability edit and add custom field values in review via Admin, we need to handle Review Add and Edit events.
- 1) First, we need to declare the observer for DetailedReview custom events. To do this, add following code in file app/code/local/MageWorkshop/Gender/etc/config.xml into <global> section:
<events> <detailedreview_adminhtml_review_edit_prepare_form> <observers> <mageworkshop_gender> <type>singleton</type> <class>MageWorkshop_Gender_Model_Observer</class> <method>editCustomReviewFields</method> </mageworkshop_gender> </observers> </detailedreview_adminhtml_review_edit_prepare_form> <detailedreview_adminhtml_review_add_prepare_form> <observers> <mageworkshop_gender> <type>singleton</type> <class>MageWorkshop_Gender_Model_Observer</class> <method>addCustomReviewFields</method> </mageworkshop_gender> </observers> </detailedreview_adminhtml_review_add_prepare_form> </events> - 2) Observers register themselves to wait for an event so that they can execute code whenever an event is fired. So, to add custom field handling, paste code from examle below into app/code/local/MageWorkshop/Gender/Model/Observer.php.
Here are examples for different field types.
Example 1 - Add "Gender" field (for select(radio) input)
public function editCustomReviewFields($observer) { $form = $observer->getEvent()->getForm(); $fieldset = $form->getElement('review_details'); $fieldset->addField('gender', 'select', array( 'name' => 'gender', 'title' => Mage::helper('detailedreview')->__('Gender'), 'label' => Mage::helper('detailedreview')->__('Gender'), 'options' => Mage::getSingleton('mageworkshop_gender/review_gender')->toOptionArray(), )); } public function addCustomReviewFields($observer) { $form = $observer->getEvent()->getForm(); $fieldset = $form->getElement('add_review_form'); $fieldset->addField('gender', 'select', array( 'name' => 'gender', 'title' => Mage::helper('detailedreview')->__('Gender'), 'label' => Mage::helper('detailedreview')->__('Gender'), 'options' => Mage::getSingleton('mageworkshop_gender/review_gender')->toOptionArray(), )); } Example 2 - field for text inputpublic function editCustomReviewFields($observer) { $form = $observer->getEvent()->getForm(); $fieldset = $form->getElement('review_details'); $fieldset->addField('custom_text_field', 'text', array( 'name' => 'custom_text_field', 'label' => Mage::helper('detailedreview')->__('Label for Custom Text Field'), )); } public function addCustomReviewFields($observer) { $form = $observer->getEvent()->getForm(); $fieldset = $form->getElement('add_review_form'); $fieldset->addField('custom_text_field', 'text', array( 'name' => 'custom_text_field', 'label' => Mage::helper('detailedreview')->__('Label for Custom Text Field'), )); } Example 3 - field for multiselect(checkbox) inputpublic function editCustomReviewFields($observer) { $form = $observer->getEvent()->getForm(); $fieldset = $form->getElement('review_details'); $fieldSet->addField('custom_multiselect_field', 'multiselect', array( 'name' => 'custom_multiselect_field', 'label' => $helper->__('Label for Custom MultiSelect Field'), 'title' => $helper->__('Label for Custom MultiSelect Field'), 'values' => Mage::getSingleton('mageworkshop_gender/review_CustomMultiSelectField')->toOptionArray(), )); } public function addCustomReviewFields($observer) { $form = $observer->getEvent()->getForm(); $fieldset = $form->getElement('add_review_form'); $fieldSet->addField('custom_multiselect_field', 'multiselect', array( 'name' => 'custom_multiselect_field', 'label' => $helper->__('Label for Custom MultiSelect Field'), 'title' => $helper->__('Label for Custom MultiSelect Field'), 'values' => Mage::getSingleton('mageworkshop_gender/review_CustomMultiSelectField')->toOptionArray(), )); } - 3) For field with type select or multiselect you need to create source model with options. So, we'll create file app/code/local/MageWorkshop/Gender/Model/Review/Gender.php
and paste following code
<?php class MageWorkshop_Gender_Model_Review_Gender { protected $_options = array(); public function getOptionArray() { $helper = Mage::helper('detailedreview'); return array( 1 => $helper->__('male'), 2 => $helper->__('female') ); } public function toOptionArray($isMultiSelect = false) { if (!$this->_options) { $this->_options = $this->getOptionArray(); } $options = $this->_options; if (!$isMultiSelect) { array_unshift($options, Mage::helper('adminhtml')->__('-- Please Select --')); } return $options; } public function getOptionValue($key) { $options = $this->getOptionArray(); return array_key_exists($key, $options) ? $options[$key] : $options[2]; } } Example for multiselect: Create app/code/local/MageWorkshop/Gender/Model/Review/CustomMultiSelectField.php and paste following code<?php class MageWorkshop_Gender_Model_Review_CustomMultiSelectField { protected $_options = array(); protected $_availableOptions = null; public function toOptionArray($isMultiSelect = false) { if (empty($this->_options)) { $helper = Mage::helper('detailedreview'); $this->_options = array( array('value'=>'1', 'label'=> $helper->__('Option 1')), array('value'=>'2', 'label'=> $helper->__('Option 2')), array('value'=>'3', 'label'=> $helper->__('Option 3')) ); } return $this->_options; } public function getAvailableOptions() { if (!isset($this->_availableOptions)) { $this->_availableOptions = array(); foreach ($this->toOptionArray(false) as $option) { $this->_availableOptions[$option['value']] = $option['label']; } } return $this->_availableOptions; } }
Step 4. Save review with custom fields
-
1) To observe custom review saving events, add following code in file app/code/local/MageWorkshop/Gender/etc/config.xml into <events> section:
<detailedreview_mysql4_review_after_save> <observers> <mageworkshop_gender> <type>singleton</type> <class>MageWorkshop_Gender_Model_Observer</class> <method>saveCustomReviewFields</method> </mageworkshop_gender> </observers> </detailedreview_mysql4_review_after_save> <detailedreview_product_review_post_available_fields> <observers> <mageworkshop_gender> <type>singleton</type> <class>MageWorkshop_Gender_Model_Observer</class> <method>addCustomAvailableReviewFields</method> </mageworkshop_gender> </observers> </detailedreview_product_review_post_available_fields> -
2) To handle custom field saving, we'll paste following code into app/code/local/MageWorkshop/Gender/Model/Observer.php.
public function saveCustomReviewFields($observer) { $review = $observer->getEvent()->getReview(); $detail = $observer->getEvent()->getDetail(); $detail ->setData('gender',$review->getGender()); } public function addCustomAvailableReviewFields($observer) { $availableFields = $observer->getEvent()->getAvailableFields(); $availableFieldsData = $availableFields->getData(); $availableFieldsData[] = 'gender'; $availableFields->setData($availableFieldsData); }
Step 5. Display custom fields on frontend
- 1) For using custom field on review form and on reviews list, we need to add it to reviews collection, when it initialises. We'll add following code in file app/code/local/MageWorkshop/Gender/etc/config.xml into <events> section:
<detailedreview_mysql4_review_collection_init> <observers> <mageworkshop_gender> <type>singleton</type> <class>MageWorkshop_Gender_Model_Observer</class> <method>selectCustomAvailableReviewFields</method> </mageworkshop_gender> </observers> </detailedreview_mysql4_review_collection_init> - 2) To handle custom fields display, we'll paste following method into app/code/local/MageWorkshop/Gender/Model/Observer.php.
public function selectCustomAvailableReviewFields($observer) { $collection = $observer->getEvent()->getCollection(); $collection->getSelect()->columns(array( 'detail.gender' )); } -
3) Next step is adding our field to review form. For existing review form template customization you need to copy file app/design/frontend/base/default/template/detailedreview/review/form.phtml to
app/design/frontend/<YOUR_THEME_PATH>/template/detailedreview/review/ and add code with new field input. For input validation you can use ready-made kits or see validation rule examples in app/code/local/MageWorkshop/DetailedReview/Helper/Validate.php.
Example 1 - Gender(select input)
<div class="gender"> <div class="left"> <span class="title"><?php echo $this->__("Gender") ?></span> </div> <div class="right gender"> <div class="wide"> <select id="gender" class="gender"> <?php $fieldValues = Mage::getSingleton('mageworkshop_gender/review_gender')->getOptionArray(); ?> <?php foreach ($fieldValues as $key => $value):?> <option class="option" value="<?php echo $this->__($value) ?>"> <?php echo $this->__($value) ?> </option> <?php endforeach; ?> </select> <div class="clearboth"></div> </div> </div> </div> Example 2 - text input<div class="custom-text-field"> <div class="left"> <span class="title"><?php echo $this->__("Label for Custom Text field") ?></span> </div> <div class="right custom-text-field"> <div class="wide"> <div class="input-box field-row with-border"> <input type="text" name="custom_text_field" id="custom_text_field_field" class="input-text <?php echo $validator->getValidationRules('title'); ?>" value="<?php echo $this->escapeHtml($data->getCustomTextField()) ?>" placeholder="<?php echo $this->__("Custom Text Field") ?>" /> </div> </div> </div> <div class="clearboth"></div> </div> Example 3 - radio input<div class="custom-select-field"> <div class="left"> <span class="title"><?php echo $this->__("Label for Custom Select Field") ?></span> </div> <div class="right custom-select-field"> <div class="wide"> <ul class="custom-select-field-options"> <?php $fieldValues = Mage::getSingleton('mageworkshop_gender/review_CustomSelectField')->getOptionArray(); ?> <?php foreach ($fieldValues as $key => $option):?> <li> <input type="radio" id="option_<?php echo $key; ?>" name="custom" value="<?php echo $key ?>" class="radio" /> <label for="<?php echo $key; ?>"><span class="option-<?php echo $key; ?>"><?php echo $option; ?></span></label> </li> <?php endforeach; ?> </ul> <div class="clearboth"></div> </div> </div> </div> -
4) After form was updated, we need to display new field contenr on reviews list. For review list template customization you need to copy file app/design/frontend/base/default/template/detailedreview/review/product/view/list.phtml to
app/design/frontend/<YOUR_THEME_PATH>/template/detailedreview/review/product/view/ and add your custom field content. Examples:
Example 1 - Gender filed (select)
<?php $gender = Mage::getSingleton('mageworkshop_gender/review_gender'); ?> <?php if ($genderOption = $_review->getGender()): ?> <li><label class="label-review-attr"><?php echo $this->__('Gender') ?>:</label><div class="value-review-attr"><?php echo nl2br($gender->getOptionValue($genderOption)); ?></div></li> <?php endif;?> Example 2 - text field<?php if ($customTextField = $_review->getcustomTextField()): ?> <li><label class="label-review-attr"><?php echo $this->__('Label for Custom Text field') ?>:</label><div class="value-review-attr"><?php echo nl2br($customTextField); ?></div></li> <?php endif;?> - Final step - we need to apply styles for new items - In case you are using SCSS - copy file skin/frontend/base/default/scss/detailedreview/detailedreview_ver_3.x.x.scss to skin/frontend/<YOUR_THEME_PATH>/scss/detailedreview/ and add styles. For css - copy file skin/frontend/base/default/css/detailedreview/detailedreview_ver_3.x.x.css to skin/frontend/<YOUR_THEME_PATH>/css/detailedreview/ and make modifications.
-
Core
In Info section are displaying current modules versions.

In Advanced options admin has ability to enable/disable or uninstall modules.

In Debug option admin has the ability to enable/disable debug, which append to the page minified/none minified JS from Detailed Review module

-
Detailed Product Review Reminder Module
Gives a possibility to choose the preferable copy method of the email.
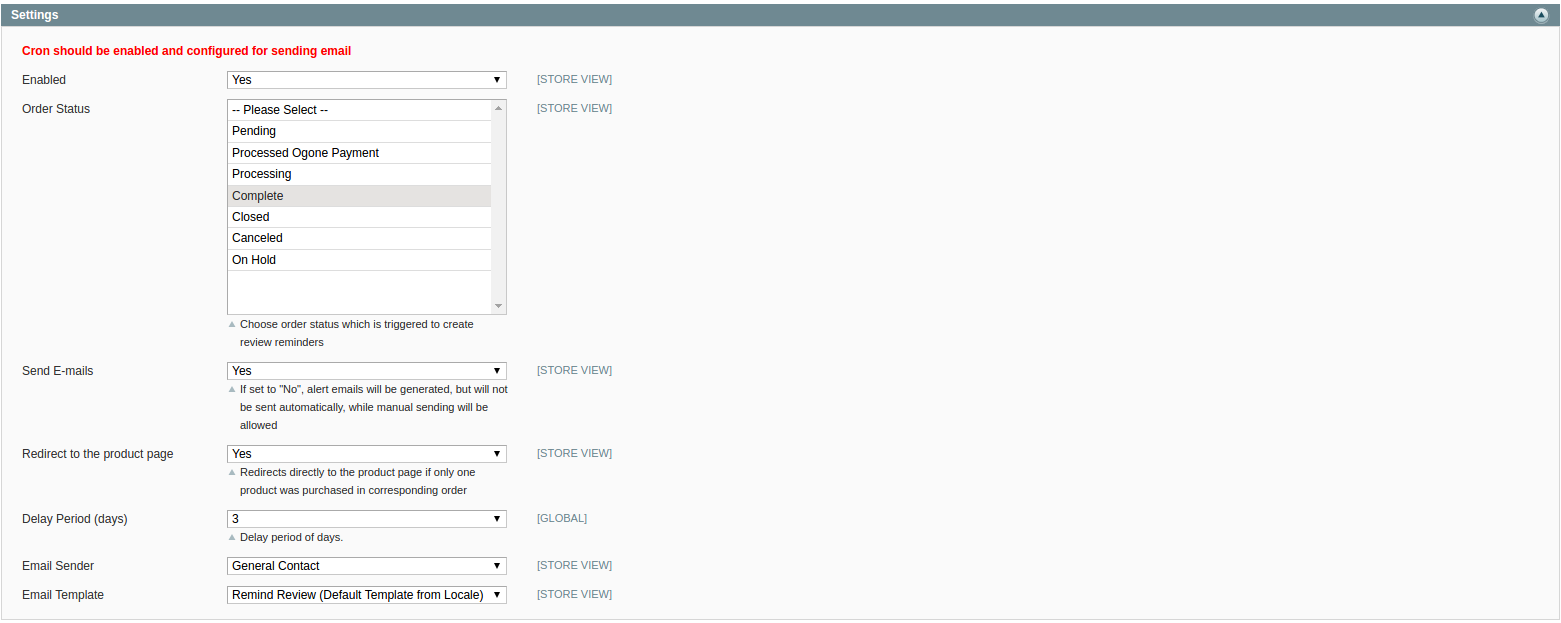
To allow the generation of review reminders you have to select “Yes” for Enable option (in case you don’t need the reminders, select “No”).
Order Status - determine status, in which Reminder creating will be triggered.
Send E-mails - allows to send emails automatically<> when the cron jobs are running on your server. If set to "No", alert emails will be generated, but will not be sent automatically, you will need to send reminders manually.
Redirect to the product page - redirects directly to the product page if only one product was purchased in corresponding order
Delay Period(days) - allows to change period when a notice from Review Reminder will be sent after an order was submitted. If the option is set to 0 or empty, delay period will be set to default (3 days).
Email Sender - field allows to choose a sender (to configure a new sender, go to System → Configuration → Store Email Addresses).
Email Template - field allows to choose the email template that will be applied for Review Reminder.
Uninstall Extension - This button will completely uninstall extension and delete all related information.
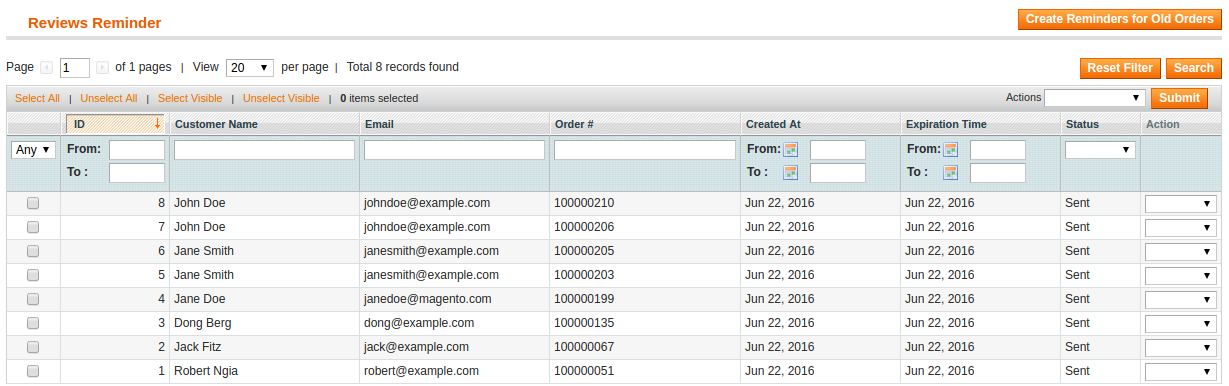
To manage Reviews Reminders, you need to go to Catalog → Reviews and Ratings → Customer Reviews → Reviews Reminder. You can view, edit, delete reminders and change status for selected reminders:
On Hold - Reminder Email should not be sent automatically, only manually;
Pending - Reminder Email should be sent automatically;
Sent - when you choose this status, Reminder Email will be sent immediately.
Create Reminders for Old Orders button allows to generate Reminders for orders, which were submitted before Detailed Product Review extension installation.
To customize Reminder email template, you need to go to System → Transactional Emails, press Add New Template and choose Remind Review template. When new email template was created, go to Detailed Review Configuration page and change Email Template configuration in Review Reminders section.
-
Review GeoIp Module
This module set the location of the customer to admin notification.

Enabled - enable/disable module.

Review Email Template - This template overrides "New Review to Admin (DetailReview)" template
-
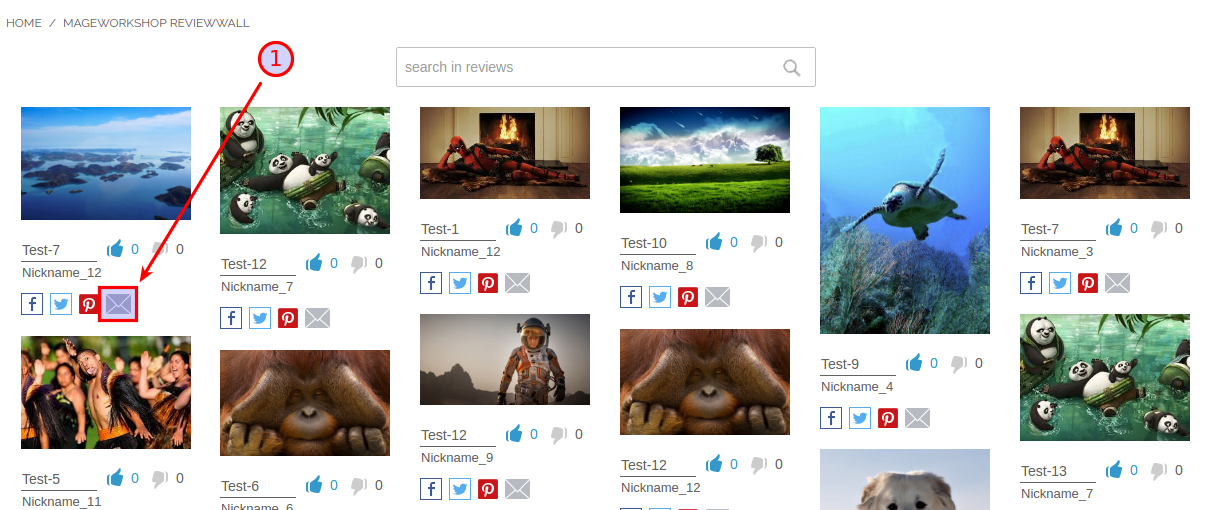
Datailed Review Wall Module
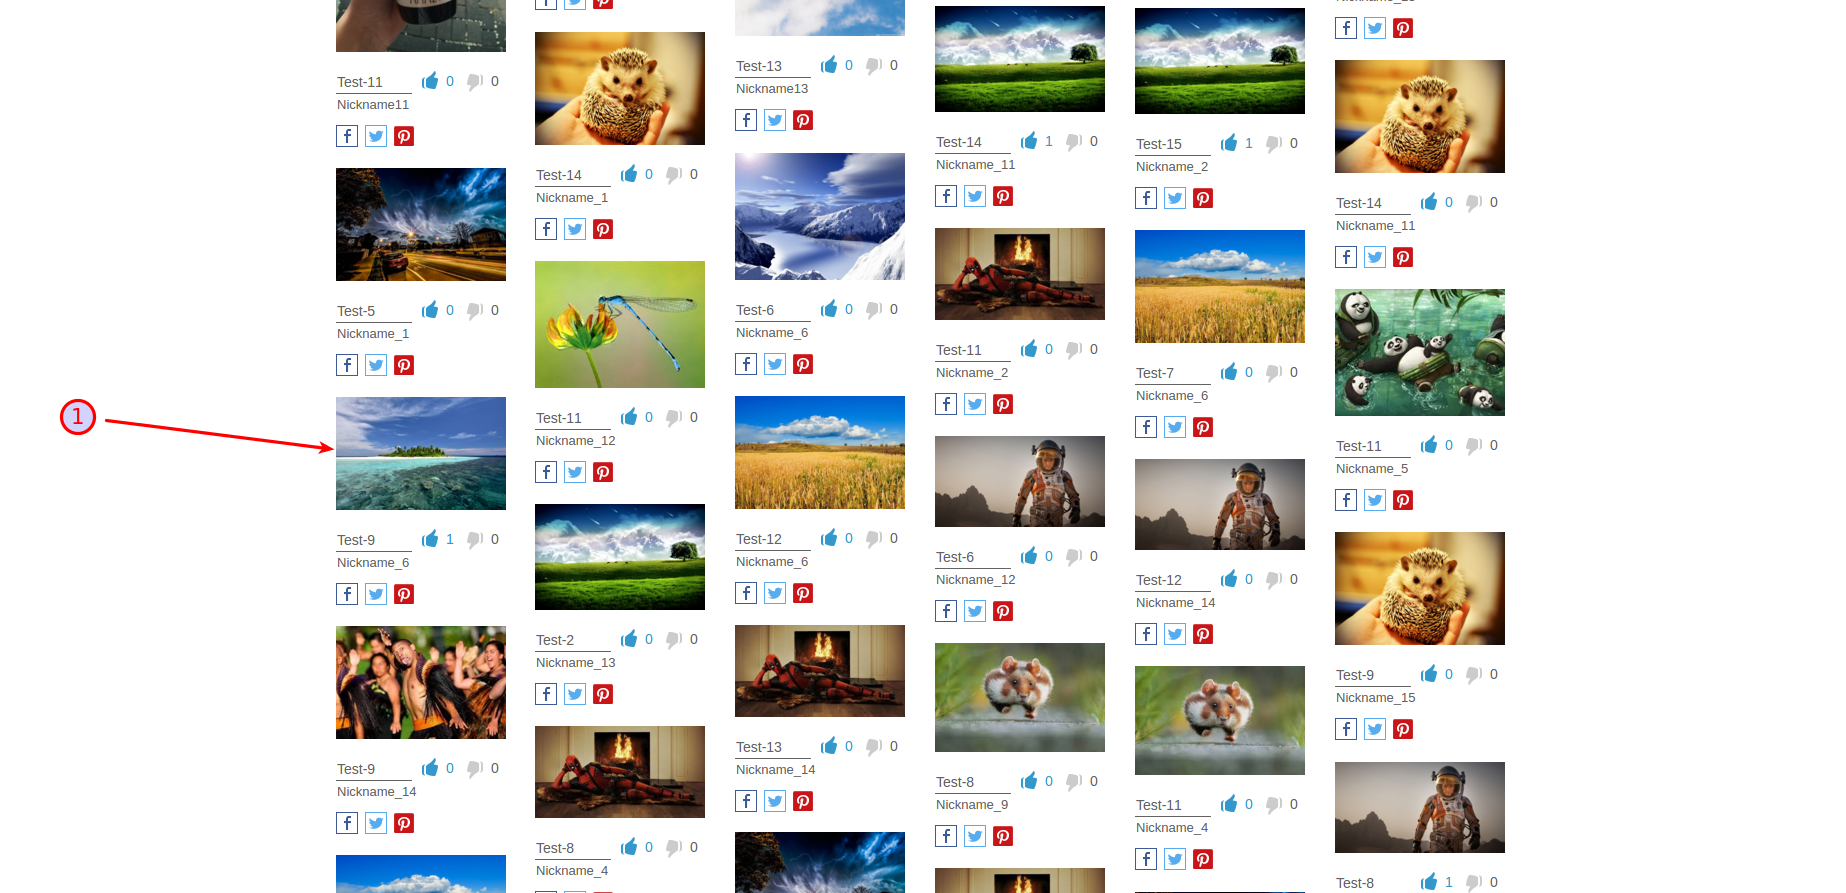
This module provides the possibility to display all reviews on CMS page use infinity scroll functionality:
Frontend:
-
1. After clicking on the review image, the customer will be redirected on the same review on the product page:

-
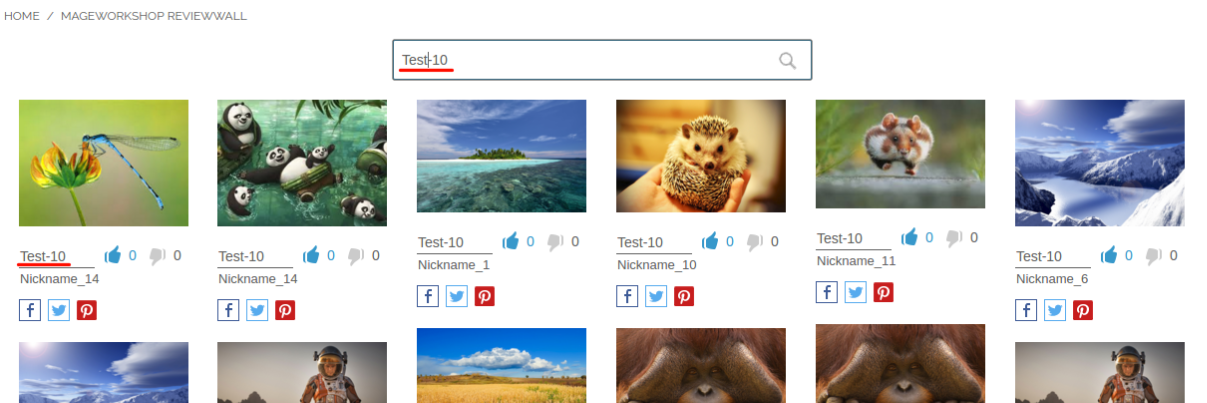
2. Review Wall Search provides ability to search by Nickname, Title, and Description of review:
-
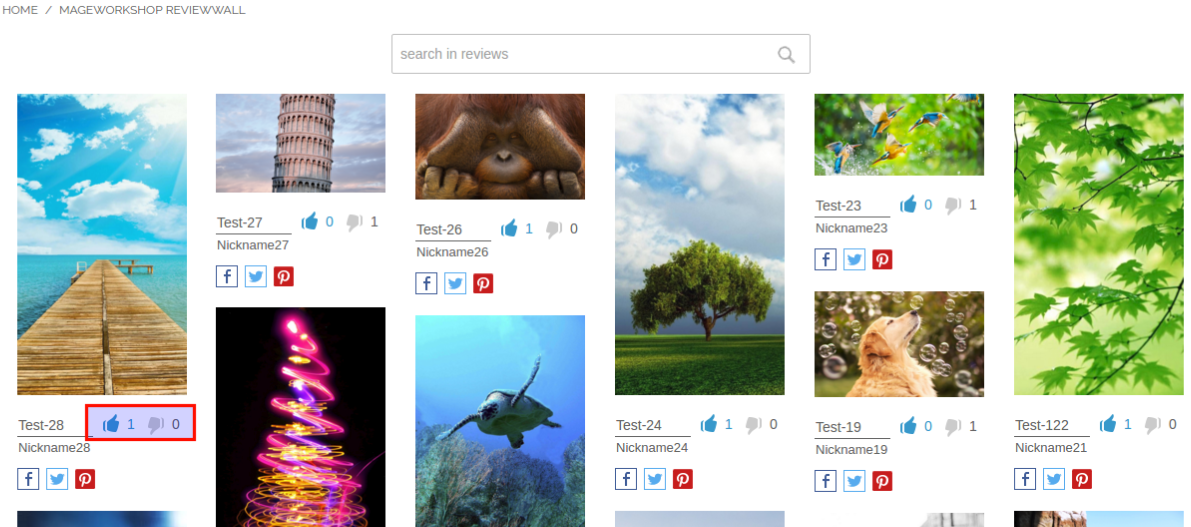
3. Ability to Vote for Review:
-
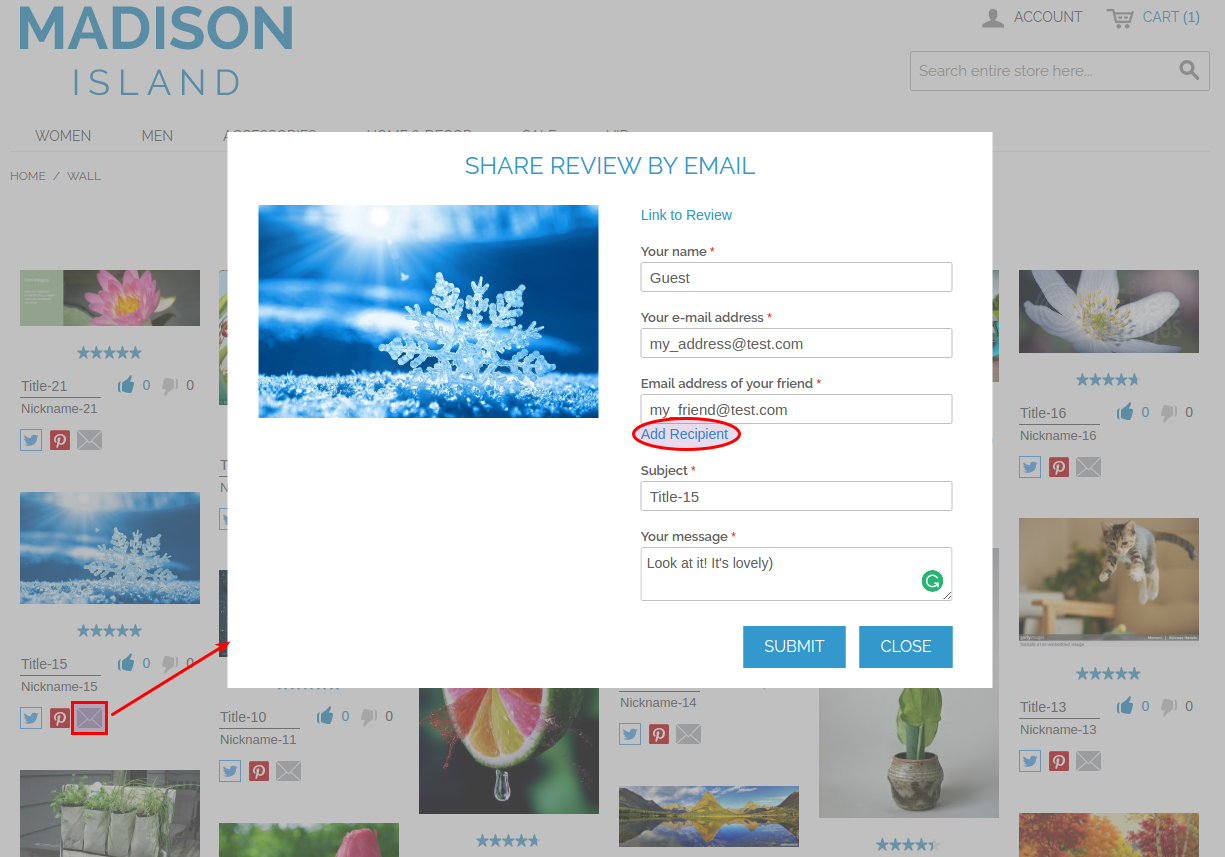
4. Social web sharing by Facebook, Twitter, Pinterest and e-mail. Customer has an ability to send email to several addresses at once.
-
5. At the first page load appears only 20 reviews, after the scroll action next 20 reviews will be loaded (by AJAX).
Backend:
-
1. Login to the admin area, go to CMS -> Page, select or create CMS page and add Review widget to Content area:
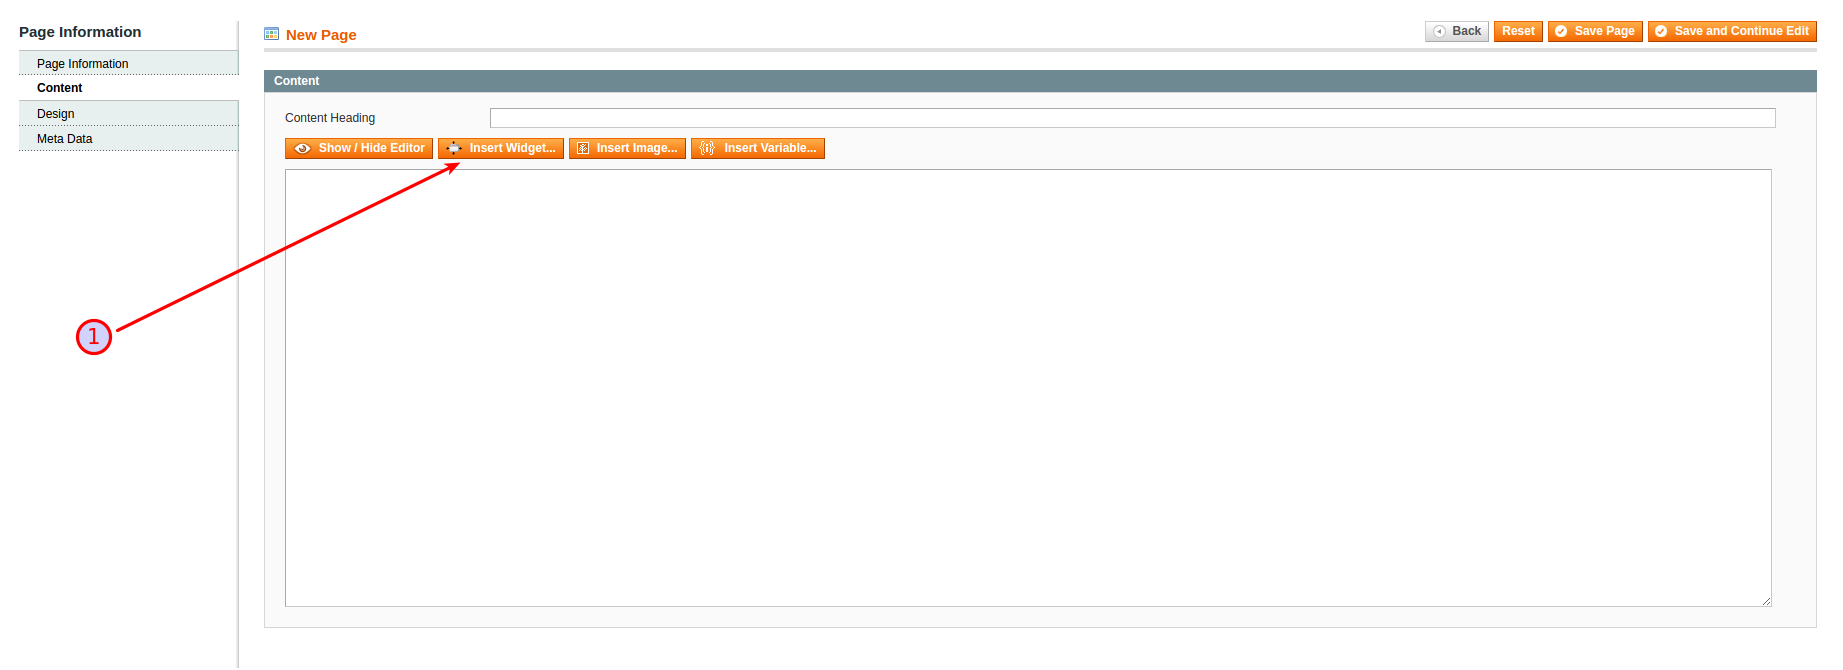
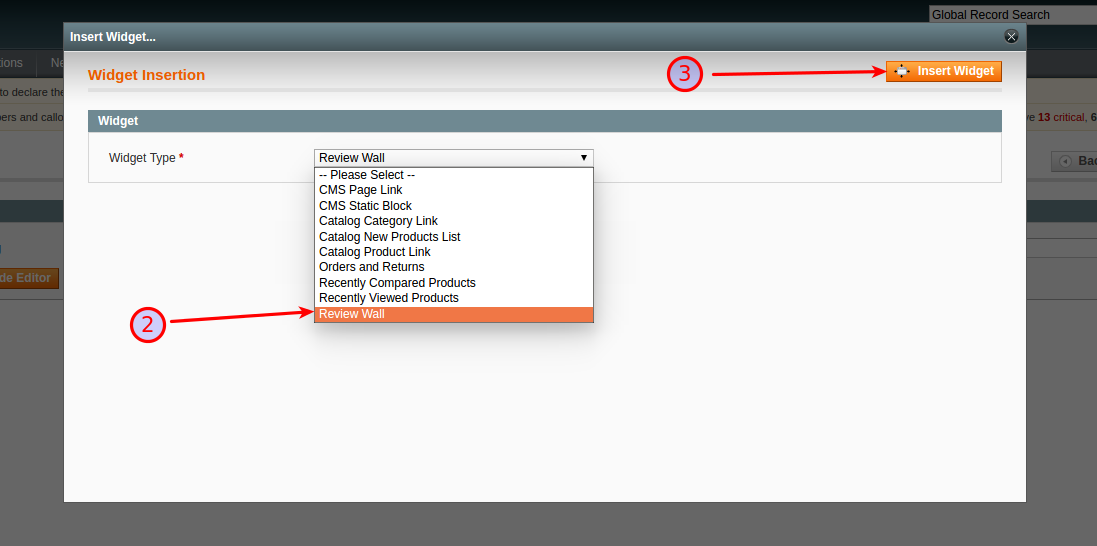
Save CMS page and clear cache.
-
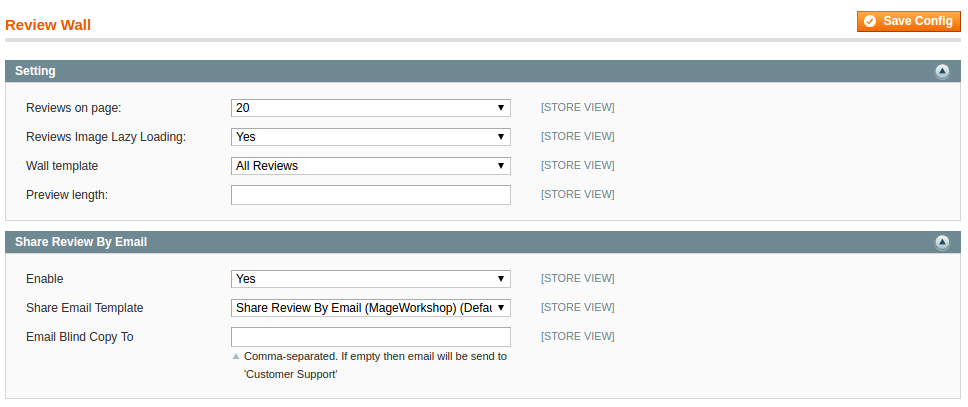
2. Review Wall configuration breadcrumb System -> Configuration -> MAGE WORKSHOP -> Review Wall-> Settings and System -> Configuration -> MAGE WORKSHOP -> Review Wall -> Share Review By Email
-
Comment On Review Module
Admin Panel:
Configuration scope:
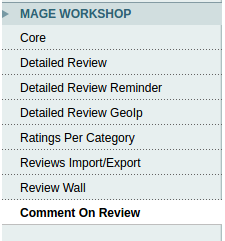
Located by path System - Configuration - Comment On Review
Setting:

The main configuration options for extension:
Enabled - allow enable/disable extension
Expander Reply - Amount of replies which should be displayed by default before hiding comments in the same thread
Minimum Count Of Reply Symbols - set minimal amount of symbols for reply
Maximum Count Of Reply Symbols - set maximum amount of symbols for reply
Nickname Suffix - change suffix which is added to nickname
Auto Approve Replies for Customer Group - set groups for which replies will be approved immediately, after left a comment
Captcha options:
If enabled, not logged in customer will show Google Recaptcha, bear in mind, main configuration options for it are located in the 'Detailed Review' extension configuration options.

Email Customer Notification:
Notification customer by his email (filled in profile) if someone left a reply on it comment. By default, this options disabled.

Reply Email Sender - from which email will send a notification
Reply Email Blind Copy To - if need adds blind copy to other emails in store
Email Admin Notification:
Send to the store administrator notification about a new reply with a text of reply, link to it and link to auto approve.

Default Email Receiver - store administrator’s email.
New Reply Email Sender - “from” will be filled with this value.
New Reply Email Copy To - set additional email address as recipient.
New Reply Copy Method - set type of send. ‘Bcc’ mean blind copy as one email and ‘Separate Email’ all - recipients will receive a copy of an email.
Comment and complaint admin panel
Located at Catalog - Reviews and Ratings - Customer Reviews
All Comments:
Default Magento grid with comments left by customers. Provides an ability to view and manage comments. By clicking on the row with comment or link Edit, admin will be redirected to the edit comment page.
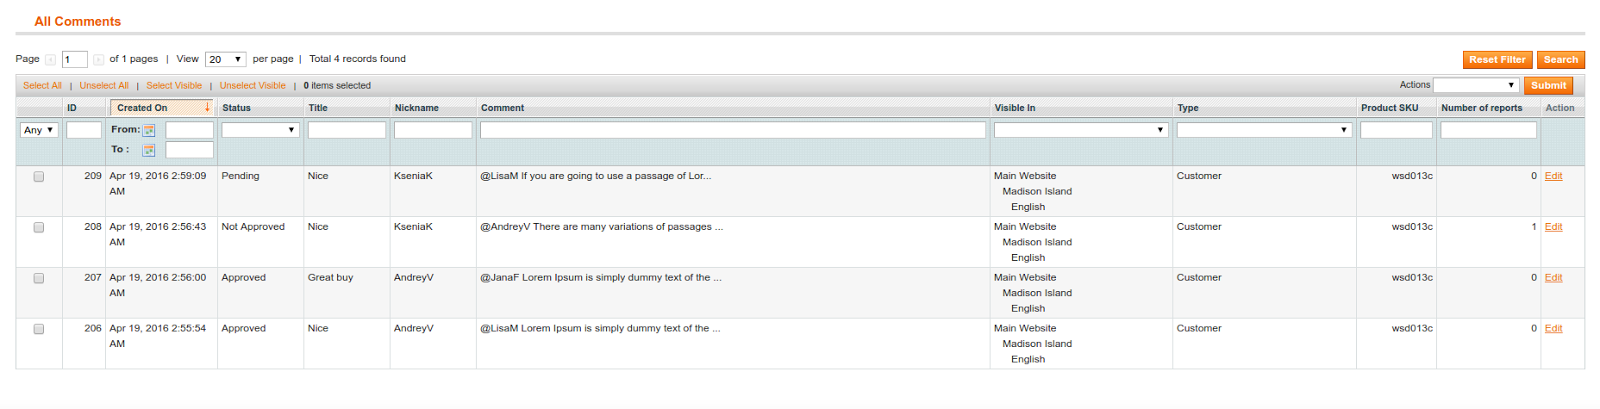
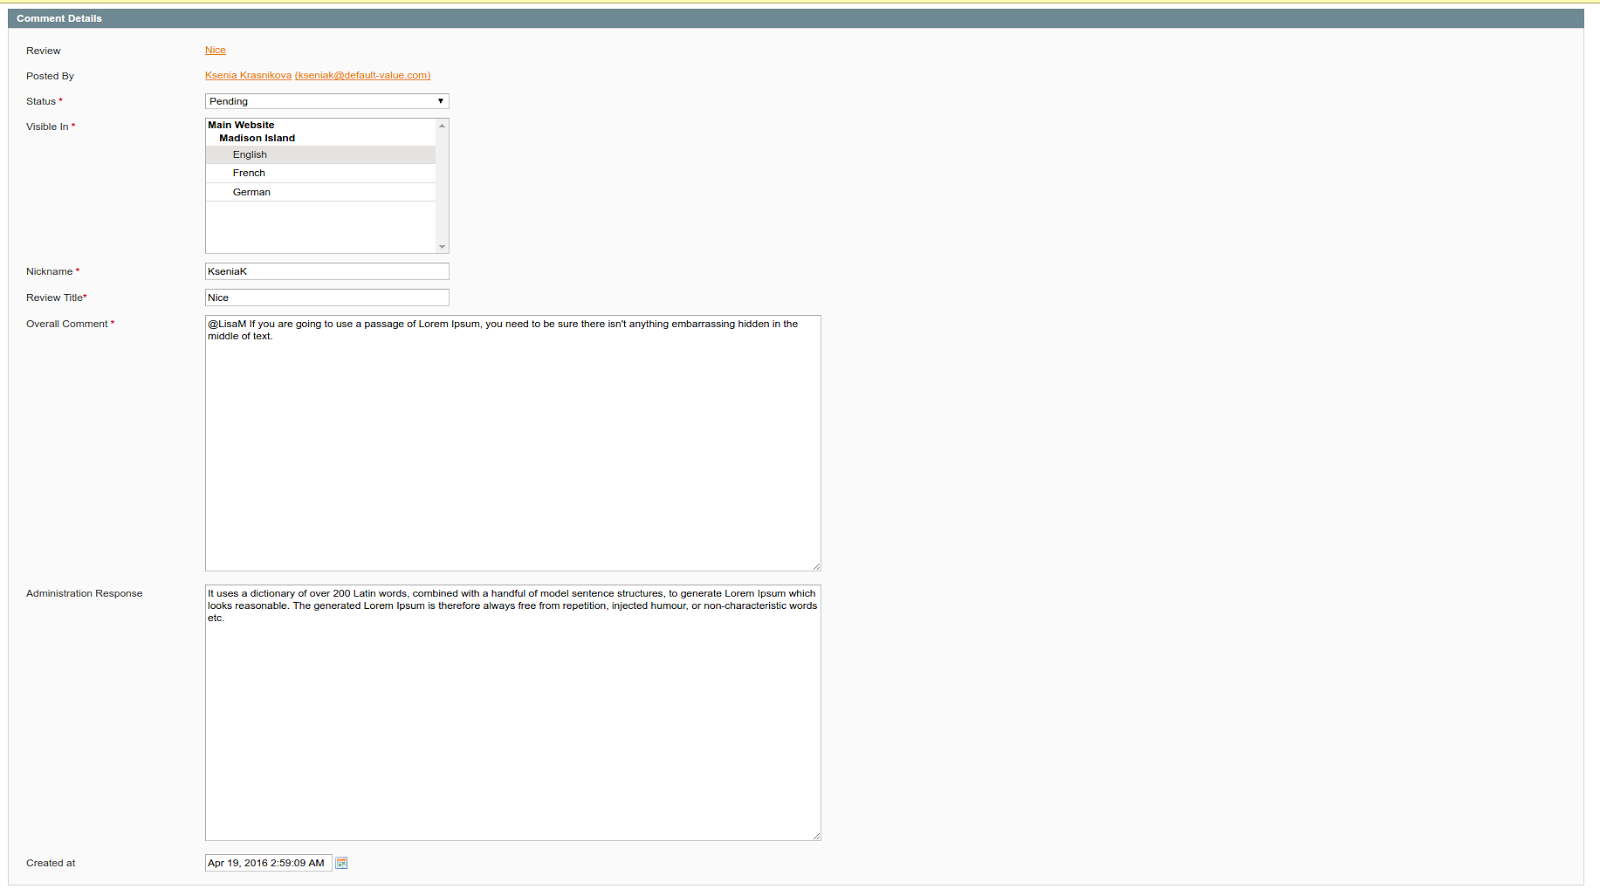
Review - link to the review on the frontend which contains this reply, (it will be highlighted after admin redirected there).
Posted By - Customer which left a comment with the full name and email.
Status - status of the comment.
Visible In - comment visibility by stores.
Nickname - author of the comment, displayed on the frontend part. It consists of First name and first letter of the last name.
Overall Comment - customer comment.
Administration Response - if need Administrator can leave comment on comment
All fields, except Review and Posted By are editable.
List of Complaints
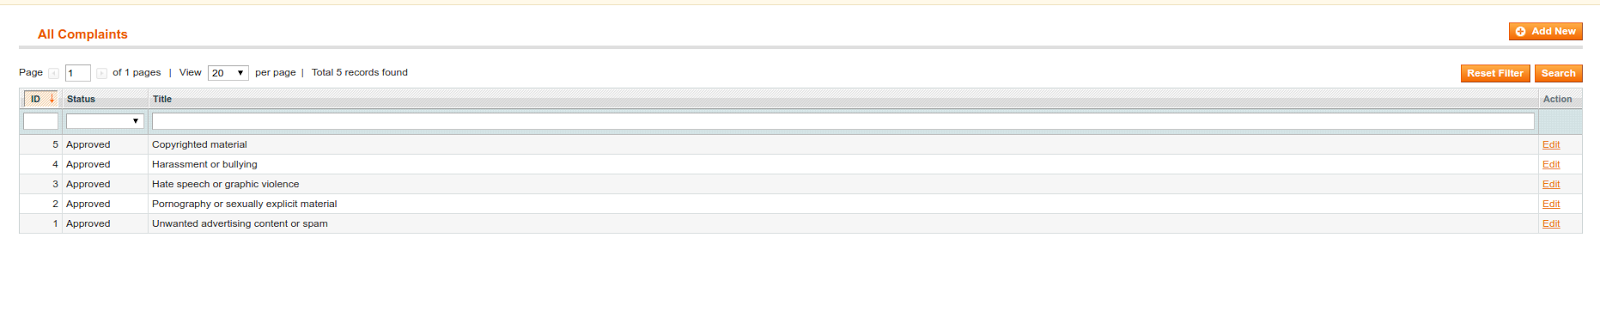
List of complaint types available on the frontend to make a complaint on a comment. Displayed only complaints with status ‘Approved’. By default after extension installation, it inserts to the database predefined list of complaints, as per the screenshot above. To add own complaint click on button ‘Add New Complaint’

Select the status of the complaint, only Approved will be shown on the frontend, and fill in input ‘Complaint Title’ with text of complaint and save it.
List of Complaints on Comment
In this section, you can view a left complaints on comments.

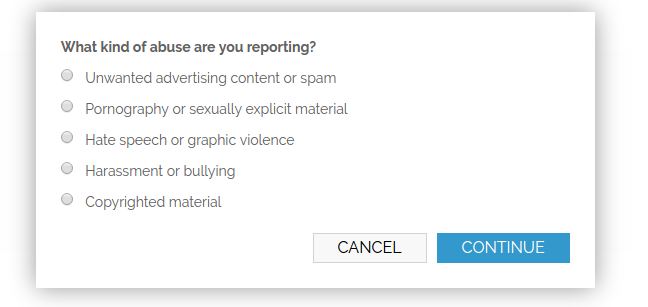
To leave a complaint to a comment, a customer should be logged in to store. After that on a right side of comment block appears icon which gives an ability open a block with list of possible complaints.
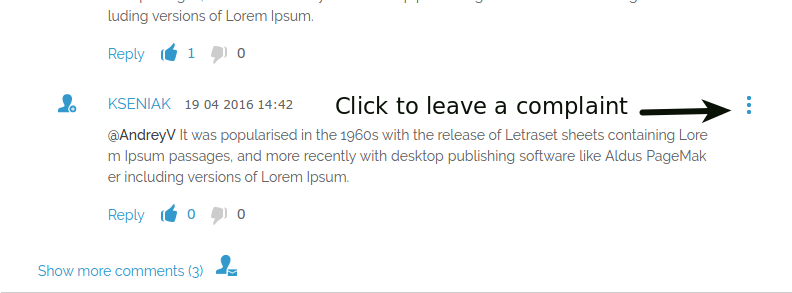
Available complaints managed in admin area
-
Detailed Product Review Import/Export Synchronization
We have added an ability to share product reviews between few Magento sites. To do it, Magento's admin user should create API user with it's own API key, to prevent export/import reviews with not trusted websites.
Synchronization Instruction
-
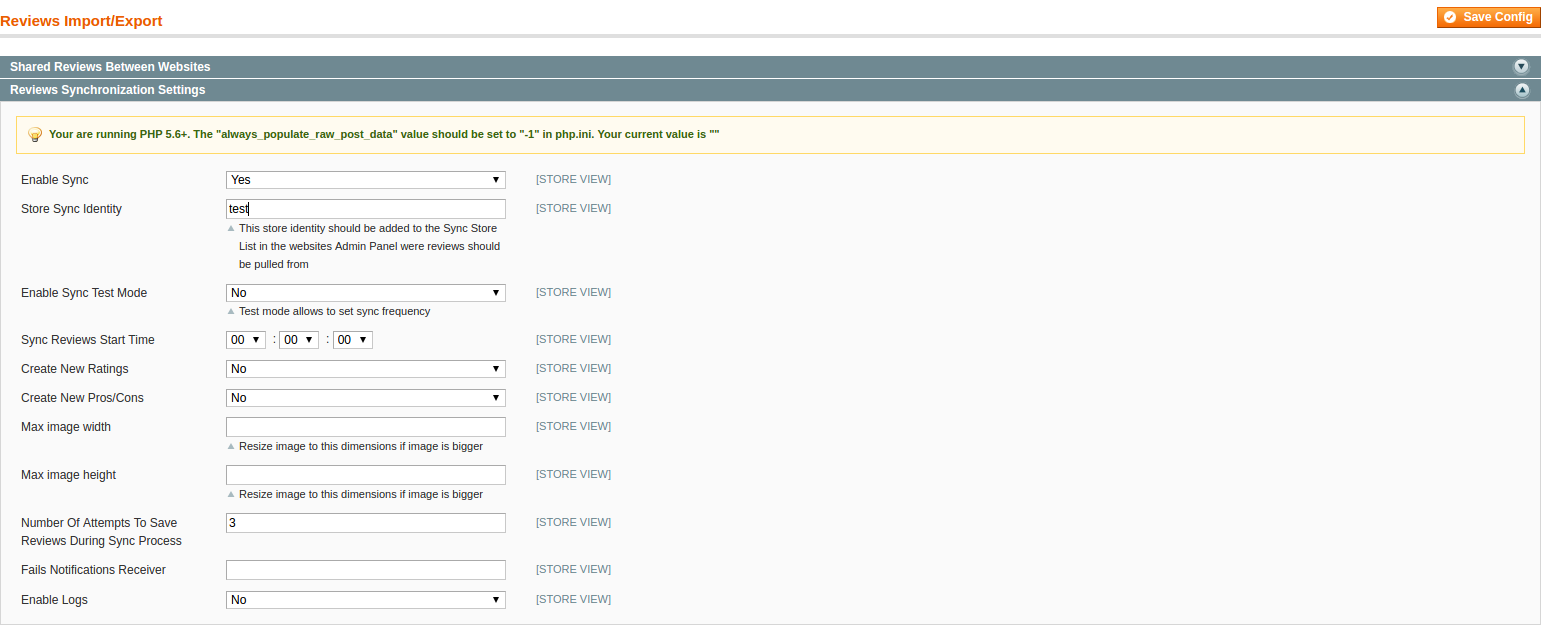
1. Enable Sync
In the Magento Admin Panel->System->Configuration->Review Import/Export->Enable Sync option should be set to "Yes", and "Store Sync Identity" should be entered.
-
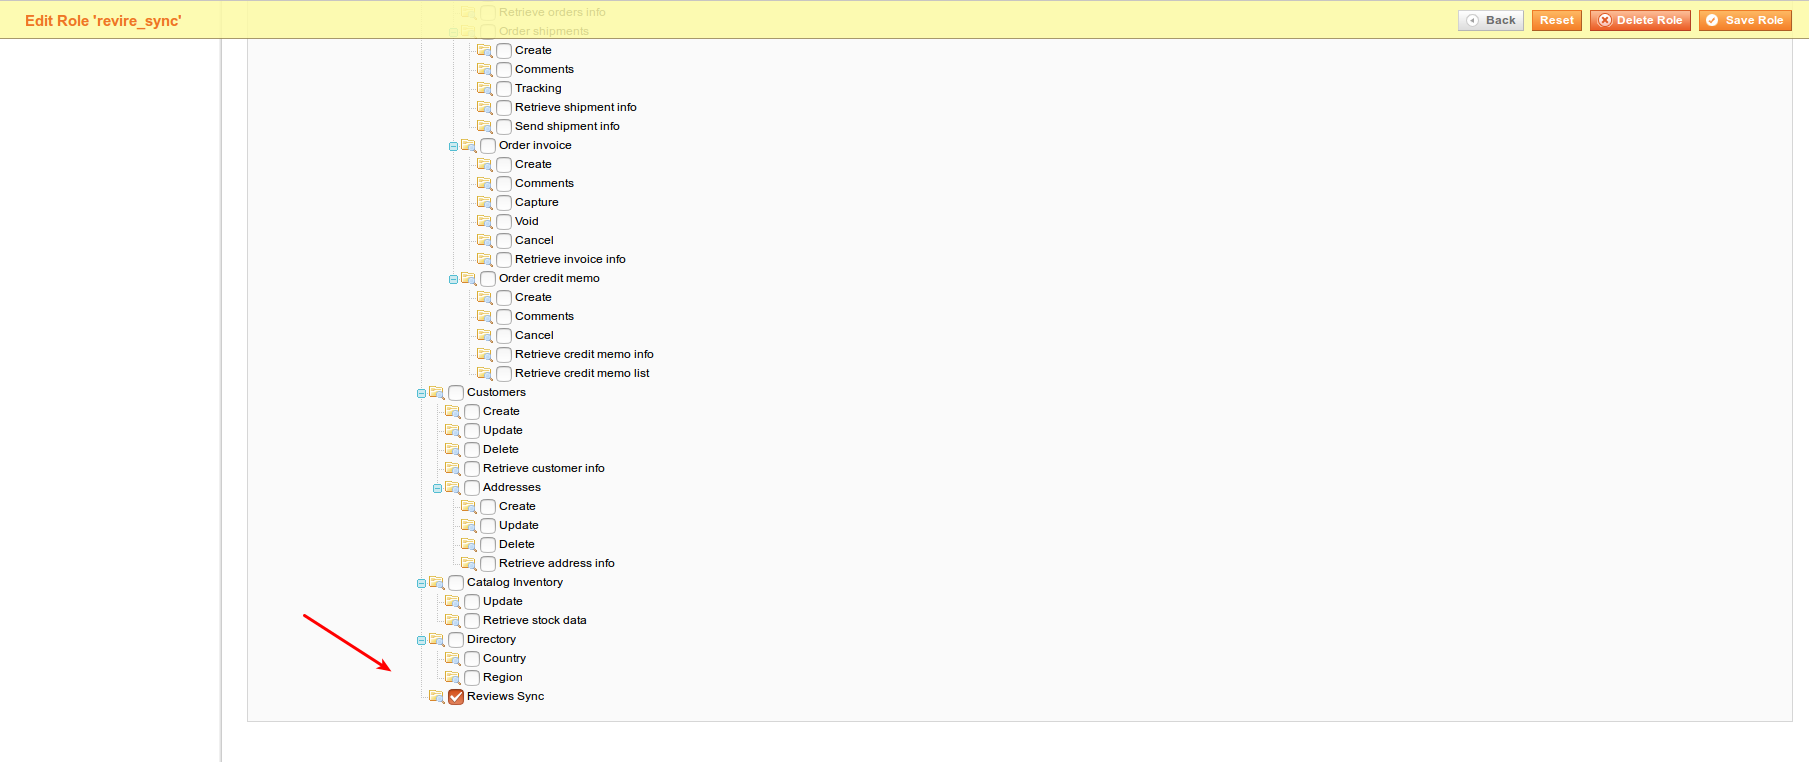
2. Creating API Role
To create API Magento admin user should create API Role first.
To do this please click "Add New Role" in Magento Admin Panel > System > Web Services > SOAP/XML-RPC - Roles.
In the "Role Info" tab Magento admin user should enter Role Name and current admin user password. In the "Role Resources" tab "Reviews Sync" option should be selected
-
3. Creating API User
After Role was created - the next should be created new API user.
To do this, Magento admin user should click "Add New User" button in Magento Admin Panel > System > Web Services > SOAP/XML-RPC - Users.
In the "User Info" tab admin should enter all fields and set "This account is" option to "Active".
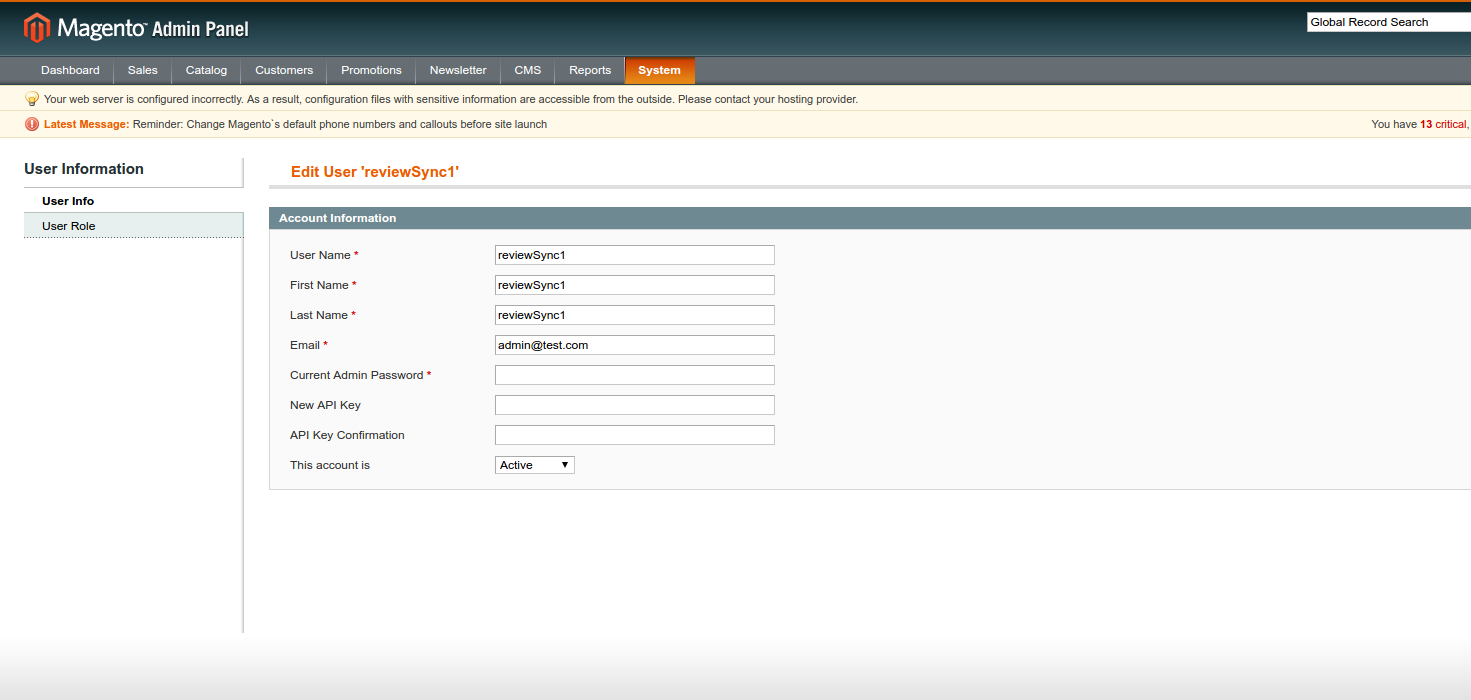
In the "User Role" tab admin user should select the role, which was created on the step #2.
-
These 3 steps should be done on all Magento websites that should be synchronized.
For example:
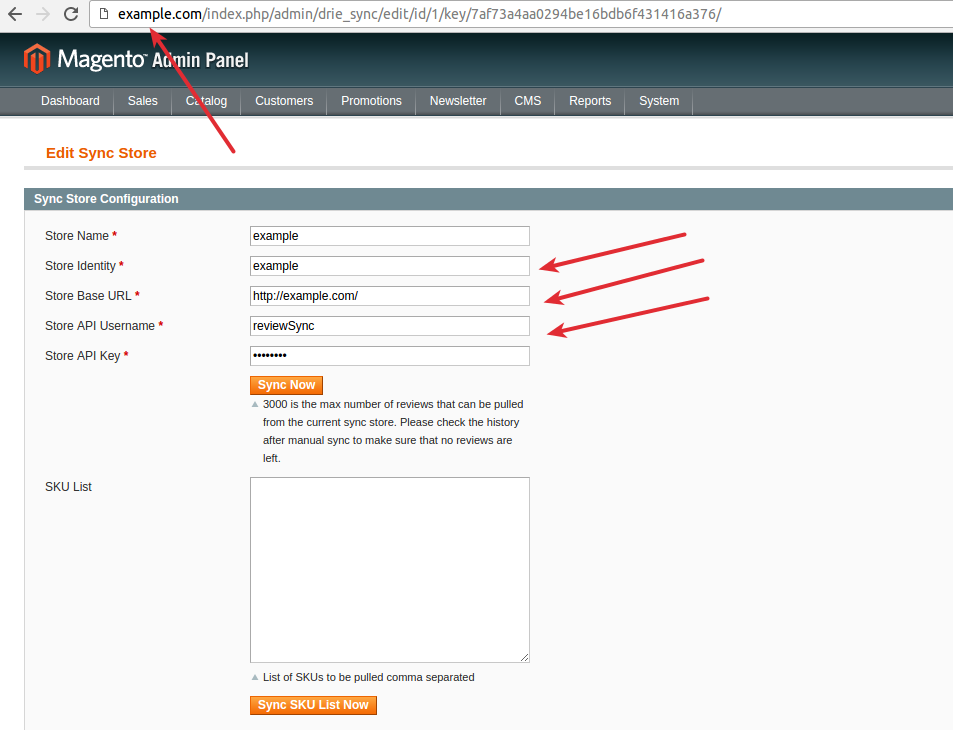
http://example.com website has Store Sync Identity "example", API username - "reviewSync", API key - "q1w2e3r4"
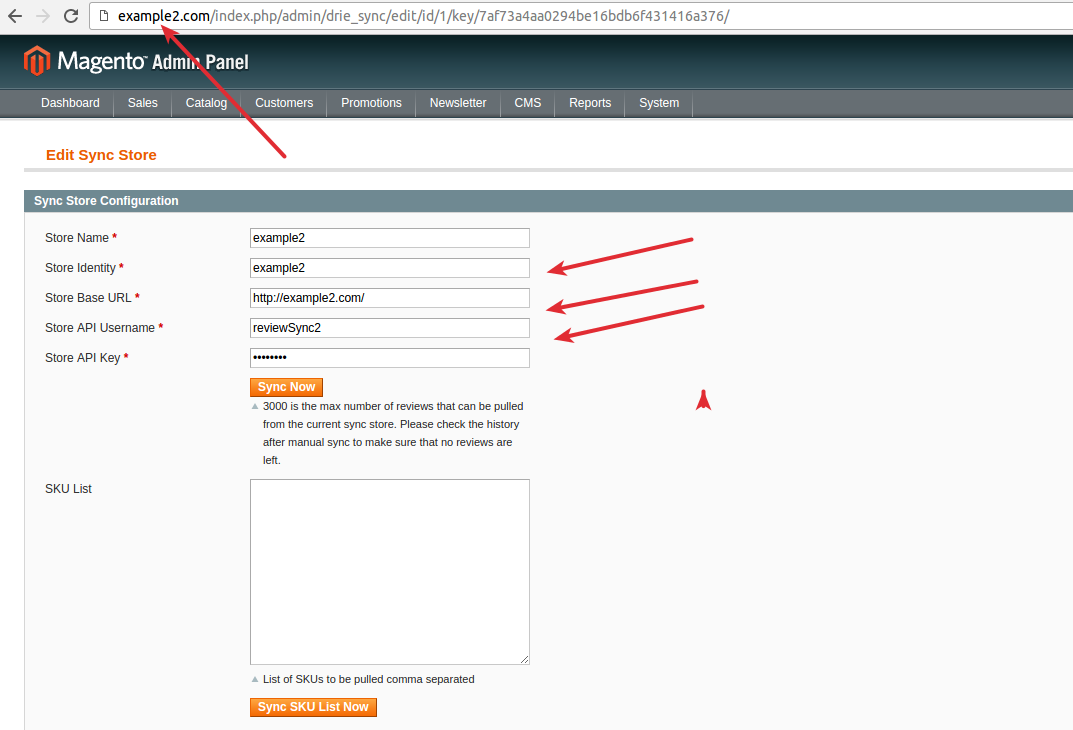
http://example2.com website has Store Sync Identity "example2", API username - "reviewSync2", API key - "q1w2e3r4"
-
4. Configuration of Sync of Stores
So we have 2 Magento websites that should be synchronized, and 3 steps (described above) were done - then please click "Add New" button in Admin Panel->Catalog->Reviews and Ratings->Reviews Synchronization->Sync Stores.
For example, to configure synchronization on example.com web-site following values should be set:
- - In the "Store Base URL" field should be entered URL to another Magento website. In our case it is http://example2.com/
- - In the "Store Identity" field should be entered store Identity from another Magento website. In our case - it is "example2"
- - In the "Store API Username" field should be entered API Username from another Magento website. In our case - it is "reviewSync2"
- - In the "Store API Key " field should be entered API Username from another Magento website. In our case - it is "q1w2e3r4"
To configure synchronization on example2.com following values should be set:
- - In the "Store Base URL" field should be entered URL to another Magento website. In our case it is http://example.com/
- - In the "Store Identity" field should be entered store Identity from another Magento website. In our case - it is "example"
- - In the "Store API Username" field should be entered API Username from another Magento website. In our case - it is "reviewSync"
- - In the "Store API Key " field should be entered API Username from another Magento website. In our case - it is "q1w2e3r4"
So example.com site should contain information about example2.com site, and example2.com site should contain information about example.com site.
-
5. Launching the Sync
After saving "Reviews Stores Sync" profile - we can run synchronization manually by clicking "Sync Now" button. Please note, that there is a limit for manual synchronization. The limit is 1000 reviews per one synchronization. So if there are more than 1000 reviews - Magento admin user should run it few times.
There is "SKU List" field on the "Reviews Stores Sync" profile page, in this field, you can enter product's SKU list to get reviews for the exact product from another website. (use "Sync SKU List Now" button instead of "Sync Now").
There is an ability to add more websites at any time. Just create "Reviews Stores Sync" profile for a new website on all other websites. In our case, we should add new "Reviews Stores Sync" profile to http://example.com and http://example2.com websites. On the http://example3.com we should add profiles for http://example.com and http://example2.com websites.
There is an ability to create Ratings, and Pros/Cons if the importing reviews have custom values. You can enable/disable creating new values in the Magento Admin Panel-> System->Configuration->Reviews Import/Export in the Reviews Synchronization Settings section. Also, there is an ability to configure synchronization by CRON. In this case, reviews will be synchronized automatically in exact time.
Reviews Import/Export Instruction
There is an ability to export product reviews to file or import review from the file. It can be done in Magento Admin Panel->Catalog->Reviews and Ratings->Reviews Import/Export.
-
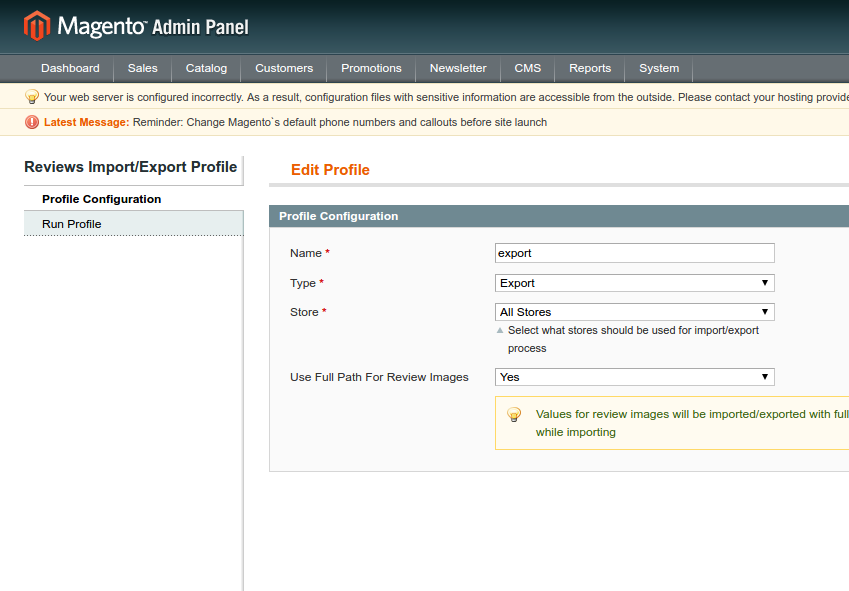
For exporting reviews:
Click "Add new" on the Magento Admin Panel->Catalog->Reviews and Ratings->Reviews Import/Export page
1. Set "Type" option to "Export",
2. Select from which store you would like to export reviews, select "All stores" to export reviews from all stores;
For image’s export there are two options:
- - Use Full Path For Review Images. In this case, images URLs will be exported and they will be automatically pulled directly from your website during the import process;
- - Copy images manually from you server to the other server where you would like to import reviews. In this case, images path will be exported, you will need to copy the reviews images using the same directories structure as it is currently on your website. For example, default images directory for the Detailed Product Review extension is "media/detailedreview", this directory should be copied over to the server where you would like to import reviews.
3. After the export profile is configured click "Save and Continue" button and the "Run Profile" tab with the run button which will appear;
4. After the export is finished the CSV file will be downloaded automatically by your browser.
-
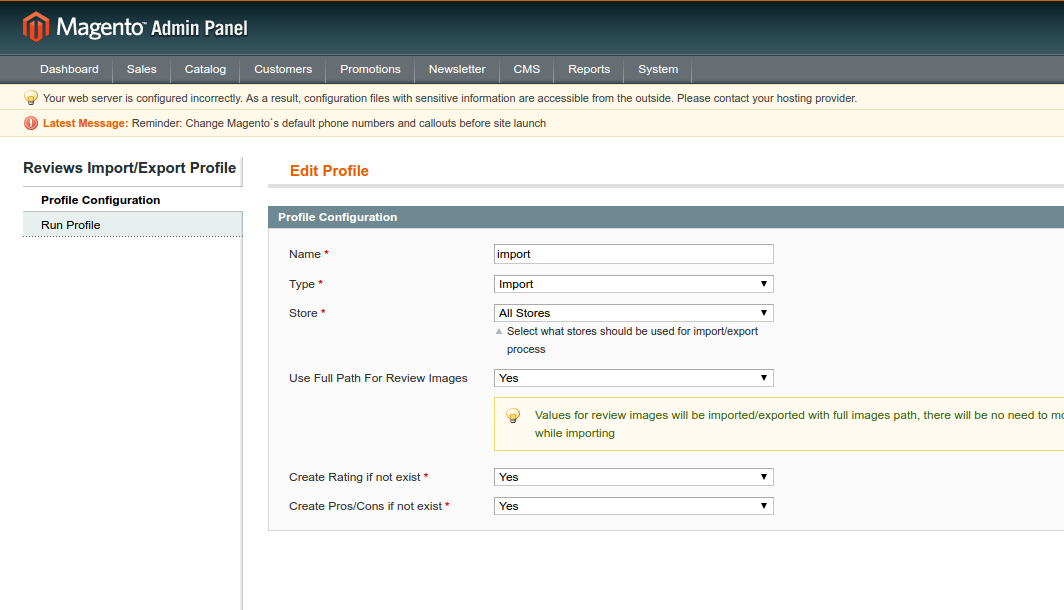
For importing reviews:
Click "Add new" on the Magento Admin Panel->Catalog->Reviews and Ratings->Reviews Import/Export page
1. Set "Type" option to "Import",
2. Select for which store you would like to import reviews, select "All stores" to import reviews to all stores;
For image’s import there are two options:
- - Use Full Path For Review Images. In this case, images URLs will be downloaded automatically from the URLs specified in the import file;
- - Copy images manually from you server to the other server where you would like to import reviews. In this case, images directory should be copied over to your server.
3. Select "Yes/No" value for "Create Rating if not exist" option.
- - "Yes" - new ratings from the import file will be created in your store. For example, there are 3 default ratings: Price, Value, Quality. If one of the reviews in the import file has the "Manufacturer" rating - this rating will be created in your store and will be visible on the frontend of your website in the new review form;
- - "No" - you will be prompted to map the existing ratings. For example, "Brand" rating can be mapped to "Manufacturer".
4. Select "Yes/No" value for "Create Pros/Cons if not exist".
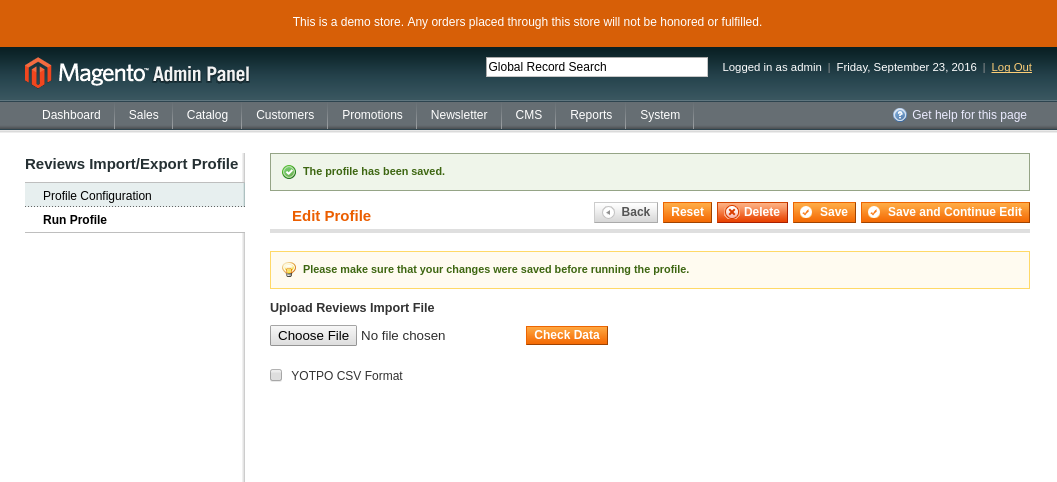
5. After the import profile is configured click "Save and Continue" button and the "Run Profile" tab with file upload form which will appear;
6. If you are importing reviews from Yotpo service - just check “YOTPO CSV Format” option on “Run Profile” tab
-
Ratings Per Category Module
This module sets ratings on the product reviews per category.
Module settings in the admin area are located in System -> Configuration -> Ratings Per Category
Enabled: enable/disable the module.
Default options: ratings which are displaying in the product review. They are displaying in all categories by default.
But if you need other ratings in some categories you can rewrite them in category settings. By following steps below.

To set an individual rating on the category the settings should be changed.
Category settings are located in Catalog -> Manage Categories
Choose a category and set options.
For example "Default category" has global settings for subcategories. But if you need other settings in the subcategory,
you can rewrite them in subcategory settings. See below.
To set subcategory settings you need to choose subcategory and select "NO" in the drop-down field of "Use Parent Category Settings for Available Ratings" option. Then choose "Available Ratings" and save the configuration.
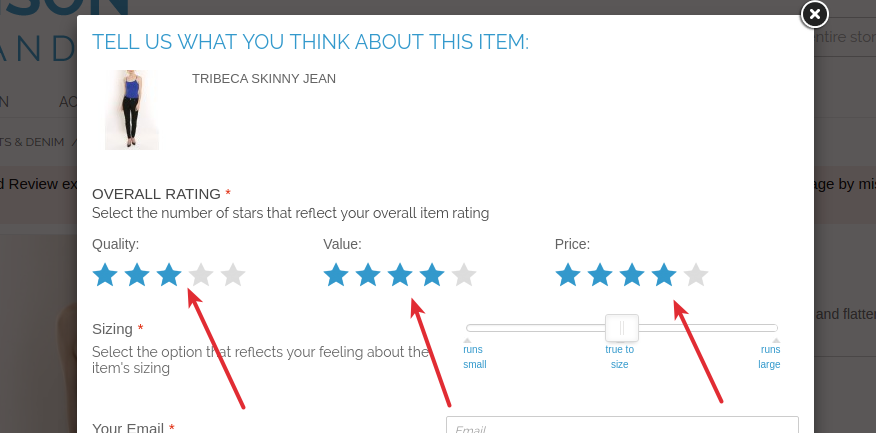
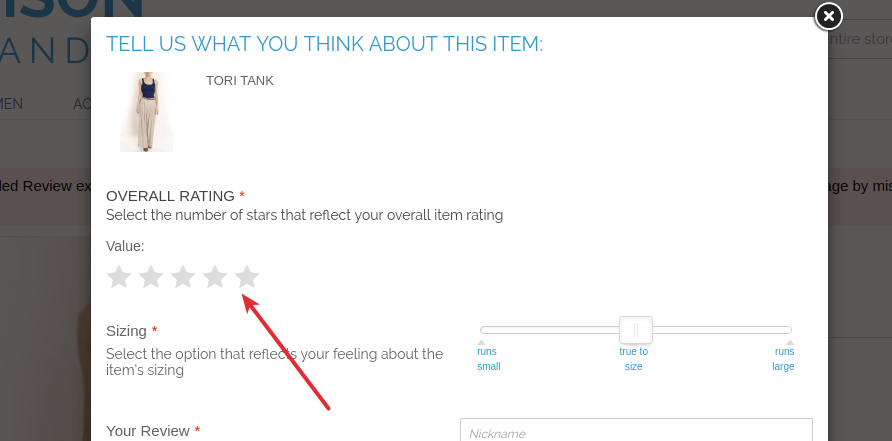
Example on frontend store.
-
Detailed Product Review Frequently Asked Question(s)
How to modify the instruction section in review form.
To make this, please copy next file
app/design/frontend/base/default/template/detailedreview/review/form.phtml into your theme.
The path will look like
app/design/frontend/<YOUR-CURRENT-THEME>/template/detailedreview/review/form.phtml
and modify next part of code -
<ul class="desc">
<li>- <?php echo $this->__("non-product related comments") ?></li>
<li>- <?php echo $this->__("price and promotion details")?></li<
<li>- <?php echo $this->__("inappropriate language")?></li>
<li>- <?php echo $this->__("info about other companies or websites") ?></li>
<li>- <?php echo $this->__("any personal info - we want to protect your privacy!") ?></li>
</ul>
Pay attention if you made changes in this text, the translation will not work. You need to do this according to Magento translation rules.
How to solve issue “SQL exception Column not found”?
In the vast majority of the cases that's a result of the cache not turned off during installation (or some of the cache types were not turned off) or reindex not run. Please make sure - that you cleaned up *any* cache you have (apc/memchached/varnish/redis/whatever), delete var/cache and run reindex.
If issue remains, uninstall DetaileReview modules and try to re-install it following installation instructions.
To uninstall DetaileReview modules You should have access to database (for example via phpMyAdmin). Select your database, select eav_attribute table, search by attribute_code for these fields: review_fields_available, use_parent_review_settings, popularity_by_sells, popularity_by_reviews, popularity_by_rating, is_banned_write_review, use_parent_proscons_settings, pros, cons. Remove them.
Also, you need to delete these tables:
- review_helpful
- review_author_ips
- review_import_export_profile
- review_import_export_rating_mapping
- review_proscons
- review_proscons_store
- review_reminders
- review_sync_history
- review_sync_store
- mageworkshop_dr_purchase
- mageworkshop_detailedreview_complaint_type
- mageworkshop_detailedreview_review_customer_complaint
And delete such columns from review_detail:
- remote_addr
- sizing
- body_type
- location
- age
- height
- good_detail
- no_good_detail
- response
- image
- video
- pros
- cons
- recommend_to
- customer_email
Remove rows with following code values from core_resource table:
- detailedreview_setup
- drcategoryratings_setup
- drreminder_setup
- mageworkshop_commentonreview_setup
- mageworkshop_importexportreview_setup
- mageworkshop_reviewwall_setup
Here is the list of MySQL commands to revert all changes in DB:
- 1) DELETE FROM eav_attribute WHERE attribute_code IN ('review_fields_available', 'use_parent_review_settings', 'popularity_by_sells', 'popularity_by_reviews', 'popularity_by_rating', 'is_banned_write_review', 'use_parent_proscons_settings', 'pros', 'cons')
- 2) DROP TABLE IF EXISTS review_helpful, review_author_ips, review_proscons, review_proscons_store, review_import_export_profile, review_import_export_rating_mapping, review_reminders, review_sync_history, review_sync_store, mageworkshop_dr_purchase, mageworkshop_detailedreview_complaint_type, mageworkshop_detailedreview_complaint_type, mageworkshop_detailedreview_review_customer_complaint
- 3) ALTER TABLE review_detail DROP COLUMN remote_addr, DROP COLUMN sizing, DROP COLUMN body_type, DROP COLUMN location, DROP COLUMN age, DROP COLUMN height, DROP COLUMN good_detail, DROP COLUMN no_good_detail, DROP COLUMN response, DROP COLUMN image, DROP COLUMN video, DROP COLUMN pros, DROP COLUMN cons, DROP COLUMN recommend_to, DROP COLUMN customer_email
- 4) DELETE FROM core_resource WHERE code IN ('detailedreview_setup', 'drcategoryratings_setup', 'drreminder_setup', 'mageworkshop_commentonreview_setup', 'mageworkshop_importexportreview_setup', 'mageworkshop_reviewwall_setup')
Note that the last command (#3) can depend on your Detailed Product Review module version (not all columns are present in your database)
Links "Review(s)” and “Add Your Review” don’t work and lead to the review tab
Most possible this issue could appear on Porto or Ultimo theme and is related to overrides.
1) How to fix overrides DR functionality in Porto theme?
To fix overrides DR functionality in Porto theme you need to make following modifications:
-
To fix issue with "Review(s)” please add to the file
app/design/frontend/base/default/template/detailedreview/review/helper/summary.phtml
(after line 36) with text
(function($) {
the following code:
$('div.product-view p.no-rating a, div.product-view .rating-links a').unbind('click')
2) How to fix overrides DR functionality in Ultimo theme?
To fix overrides DR functionality in Ultimo theme you need to make following modifications:
-
1. It related to incorrect id name for review tab. To fix this issue you need to update javascript code in
file
app/design/frontend/ultimo/<YOUR-THEME>/template/catalog/product/view/tabs.phtml -
2. Find and change next code
change
var indexOfTab = $panels.children(".acctab").index($("#acctab-tabreviews")); to
var indexOfTab = $panels.children(".acctab").index($("#acctab-tab_reviews")); and change
var indexOfTab = $tabs.children("#tab-tabreviews").index(); to
var indexOfTab = $tabs.children("#tab-tab_reviews").index(); - 3. Clean cache
How to solve issue with duplication of stars?
To fix issue with stars please add next code to you custom.css file
.reviews-wrapper #feedback .review-top .ratings-and-size .review-right .separate-rating .rating-box:before,
.reviews-wrapper #feedback #customer-reviews .ratings-table .rating-box .rating:before,
.reviews-wrapper #feedback #customer-reviews .ratings-table .rating-box:before,
.reviews-wrapper #feedback .review-top .average-rating .rating-stars-views .rating-box:before,
.reviews-wrapper #feedback .review-top .average-rating .rating-box .rating:before,
.reviews-wrapper #feedback .review-top .ratings-and-size .review-right .separate-rating .rating-box .rating:before {
display: none;
}
body .reviews-wrapper #feedback .review-top .ratings-and-size .review-right .separate-rating .rating-box {
text-indent: 0;
font-size: 12px;
line-height: 18px;
width: 69px;
height: 15px;
}
body .reviews-wrapper #feedback .review-top .ratings-and-size .review-right .separate-rating .rating-box .rating {
height: 15px;
}
Reason and fix for Fatal error: Class 'MageWorkshop_DetailedReview_Helper_Data' not found in /home/devhorace/public_html/app/Mage.php on line 547
The extension package has included two obfuscated files:
app / code / local / MageWorkshop / DetailedReview / Model / Observer.php
app / code / local / MageWorkshop / DetailedReview / Helper / Data.php
That files containing part of the license generation algorithm.
If there is antivirus software installed on the server or there is one which is providing by hosting provider as part of the hosting service then there is possibility false-positive antivirus activation.
To prevent it this files should be added to the ignore list.
If above files have been deleted appeared following Error
To solve it please use ones from the module package to restore them (unpack and copy them to the corresponding paths).
How to display the 'Recent Reviews' extension slider on the CMS page?
Please, find needed cms page in the Admin Panel and add next code in "Layout Update XML" block:
<reference name="head">
<action method="addItem" ifconfig="detailedreview/settings/enable"><type>skin_css</type><name>css/detailedreview/ratings.css</name></action>
<block type="page/html_head" template="detailedreview/style/css.phtml" />
</reference>
<reference name="content">
<block type="detailedreview/recentlyReviews" name="recently_reviews" after="-">
<action method="setTemplate" ifconfig="detailedreview/settings/enable"><template>detailedreview/recently_reviews.phtml</template></action>
<action method="setIsPerCategory"><value>1</value></action>
</block>
</reference>
<reference name="before_body_end">
<block type="core/template" name="detailedreview_header_include_css">
<action method="setTemplate" ifconfig="detailedreview/settings/enable"><template>detailedreview/include_css.phtml</template></action>
</block>
<block type="core/template" name="detailedreview_header_include_js">
<action method="setTemplate" ifconfig="detailedreview/settings/enable"><template>detailedreview/include_js.phtml</template></action>
</block>
</reference>
How change the company name in Twitter share?
1) You should copy next file app/design/frontend/base/default/template/detailedreview/review/product/view/list.phtml
into your theme.
2) The path will look like app/design/frontend/YOUR_CURRENT_THEME/template/detailedreview/review/product/view/list.phtml
3) Find in it the data-via="DetailedReview" and change to data-via="YourCompanyName"
4) Clear the cache
How to modify the “About You Section” form fields?
You should copy next file app/design/frontend/base/default/template/detailedreview/review/form.phtml into your theme. The path will look like app/design/frontend/<YOUR-CURRENT-THEME>/template/detailedreview/review/form.phtml and modify him.
How to modify the Body Type form field in review form so it will show a text label instead of an image?
You should copy next file app/design/frontend/base/default/template/detailedreview/review/form.phtml
into your theme.
The path will look like app/design/frontend/<YOUR-CURRENT-THEME>/template/detailedreview/review/form.phtml and modify it.
<?php $bodyTypes = Mage::getSingleton('detailedreview/review_bodyType')->getOptionArray(); ?>
<?php foreach ($bodyTypes as $key => $bodyType):?>
<li>
<label for="<?php echo $bodyType; ?>"><span class="image-<?php echo $bodyType; ?>"></span></label>
<input type="radio" id="<?php echo $bodyType; ?>" name="body_type" value="<?php echo $key ?>" class="radio" />
</li>
<?php endforeach; ?>
</ul>
Change labels you can here app/code/local/MageWorkshop/DetailedReview/Model/Review/BodyType.php
const BODY_TYPE_INVERTED_TRIANGLE = 2;
const BODY_TYPE_HOURGLASS = 3;
const BODY_TYPE_RECTANGLE = 4;
const BODY_TYPE_APPLE = 5;
/**
* @return array
*/
public function getOptionArray()
{
return array(
self::BODY_TYPE_TRIANGLE => 'triangle',
self::BODY_TYPE_INVERTED_TRIANGLE => 'inverted-triangle',
self::BODY_TYPE_HOURGLASS => 'hourglass',
self::BODY_TYPE_RECTANGLE => 'rectangle',
self::BODY_TYPE_APPLE => 'apple',
);
}
How to solve issue with overriding theme's custom stylesheet by extension?
Note the extension applies the styles only to own blocks or classes. Also, the important role has the enclosure of classes. So, changing the boot order of the styles, in this case, does not help.
The best solution in such case is to make copy CSS (skin/frontend/base/default/css/detailedreview) and images (skin/frontend/base/default/images/detailedreview) folder to your theme's skin folder.
The path will look like skin/frontend/<YOUR-CURRENT-THEME>/css/detailedreview and skin/frontend/<YOUR-CURRENT-THEME>/images/detailedreview . And modify them to suit your needs.
Easy Tabs
In your admin panel go to the Templates Master - Easy Tabs choose block easytabs/tab_product_review and replace title with next code getReviewsCollection()->count() to the getReviewsCollection()->getSize() it should be something like Reviews ({{eval code="getReviewsCollection()->getSize()"}})
How to display rating stars?
Login to the admin area, go to Catalog -> Review and Rating -> Manage and Rating, select the value for rating (Price, Quality, Value), click on it, make visible for the store and save changes. Please check that the default Magento Review module enabled, System -> Configuration -> Advanced and find the Mage_Review, Make sure that the status Enable.
I’ve installed the extension, but can’t find it in the admin area. What should I do?
You need re-login into Admin Panel. If this won’t help then Flush Magento Cache and launch Reindex.
I need to uninstall the extension. Do I need to do this using Magento Downloader?
No, you need to login to Admin Panel, then proceed to System -> Configuration -> Mage Workshop -> Core and go to the Advanced Options section. Then click “Uninstall” link and confirm that you want to delete extension.
I’ve uninstalled the extension using Magento downloader despite the red label near uninstall button and now frontend and backend are broken. What should I do?
You should have access to database (for example via phpMyAdmin). Select your database, select eav_attribute table, search by attribute_code for these fields: review_fields_available, use_parent_review_settings, popularity_by_sells, popularity_by_reviews, popularity_by_rating, is_banned_write_review, use_parent_proscons_settings, pros, cons. Remove them.
Also, you need to delete these tables:
- review_helpful
- review_author_ips
- review_import_export_profile
- review_import_export_rating_mapping
- review_proscons
- review_proscons_store
- review_reminders
- review_sync_history
- review_sync_store
- mageworkshop_dr_purchase
- mageworkshop_detailedreview_complaint_type
- mageworkshop_detailedreview_review_customer_complaint
And delete such columns from review_detail:
- remote_addr
- sizing
- body_type
- location
- age
- height
- good_detail
- no_good_detail
- response
- image
- video
- pros
- cons
- recommend_to
- customer_email
Remove rows with following code values from core_resource table:
- detailedreview_setup
- drcategoryratings_setup
- drreminder_setup
- mageworkshop_commentonreview_setup
- mageworkshop_importexportreview_setup
- mageworkshop_reviewwall_setup
Here is the list of MySQL commands to revert all changes in DB:
- 1) DELETE FROM eav_attribute WHERE attribute_code IN ('review_fields_available', 'use_parent_review_settings', 'popularity_by_sells', 'popularity_by_reviews', 'popularity_by_rating', 'is_banned_write_review', 'use_parent_proscons_settings', 'pros', 'cons')
- 2) DROP TABLE IF EXISTS review_helpful, review_author_ips, review_proscons, review_proscons_store, review_import_export_profile, review_import_export_rating_mapping, review_reminders, review_sync_history, review_sync_store, mageworkshop_dr_purchase, mageworkshop_detailedreview_complaint_type, mageworkshop_detailedreview_complaint_type, mageworkshop_detailedreview_review_customer_complaint
- 3) ALTER TABLE review_detail DROP COLUMN remote_addr, DROP COLUMN sizing, DROP COLUMN body_type, DROP COLUMN location, DROP COLUMN age, DROP COLUMN height, DROP COLUMN good_detail, DROP COLUMN no_good_detail, DROP COLUMN response, DROP COLUMN image, DROP COLUMN video, DROP COLUMN pros, DROP COLUMN cons, DROP COLUMN recommend_to, DROP COLUMN customer_email
- 4) DELETE FROM core_resource WHERE code IN ('detailedreview_setup', 'drcategoryratings_setup', 'drreminder_setup', 'mageworkshop_commentonreview_setup', 'mageworkshop_importexportreview_setup', 'mageworkshop_reviewwall_setup')
Note that the last command (#3) can depend on your Detailed Product Review module version (not all columns are present in your database)
Is there an ability to change rating stars?
Yes, it is. You need to login to Admin Panel and go to System -> Configuration -> Detailed Review tab and expand Rating Images section. Then click on “Choose file” button for appropriate fields.
I have a problem in “Recent Reviews” block. It shows Magento default logo instead of the product thumbnail image. How can it be fixed?
This is actual only for early extension versions. So just update the extension. If there is no ability to do so for some reasons go to Admin Panel → System → Configuration → Catalog Tab, expand Frontend section and disable “Use Flat Catalog Category” and “Use Flat Catalog Categories" options.
How do I change the location of the review in the product view page?
You can put div with class "reviews-placeholder" on the page and Detailed Product Review will be displayed inside.
I got an error after installation, on product Magento crashes with SQLSTATE[42S22]: Column not found: 1054 Unknown column 'main_table.use_parent_review_settings' in field list, how I can fix this?
You need to login to Admin Panel, then Flush Magento Cache and launch Reindex.
If issue remains, uninstall DetaileReview modules (see instruction for uninstall above) and try to re-install it following installation instructions.
After installation of Detailed Review extension, old reviews will remain on my website?
All previous reviews will be displayed after installation of our extension.
-
Contacts and Support
If you found any bugs, you think some functionality is missing or does not work properly or you having issues in the extension setup or customization please contact us at [email protected] We are always happy to help
Social Share
Here you can enable or disable additional fields for sharing the review in social networks (facebook or twitter) which will be available for the user on front-end on the product page. Also, there could be configured displaying recommend this product to a friend or not.
To get Facebook App id you have to follow by path https://developers.facebook.com/?advanced_app_create=true and fill in fields and click ‘Create App ID’ button
After that, you will be redirected to the dashboard page where you have to set domain for your site(s).
In the block 'Get Started with Facebook SDK ' click ‘Choose a Platform’ button and in pop-up window choose 'Website'.
Enter domain name and click ‘Next’.
If you need to add more than one domain you can do it in your own cabinet and fill in field like on screenshot below.
After that in the Magento Admin Panel by the path System - Configuration on left menu choose ‘Detailed Review’ and find panel with ‘Social Share’ settings and fill in your ‘Facebook App ID Key’ and ‘Facebook App Secret Key’